
February 17, 2006
Lisa: shrinky
As you know, Sarah and I have been talking a little bit about selling the things we make, on Etsy and elsewhere. We have been thinking about packaging as well. I designed a round version of our logo, and I think we are going to investigate getting some stickers made to seal poly bags or to stick on top of marble tins. Then I came up with the brilliant plan of making tags with our logo out of shrink plastic (remember Shrinky Dinks?). They make sheets of shrink plastic that you can put in an inkjet printer now, and I've been wanting to try them out for a while. After striking out at JoAnn's, Office Max, and Michaels, I finally found the printable shrink plastic at Roberts, but there was only one brand to choose from: Grafix Arts.
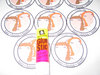
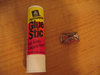
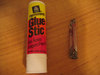
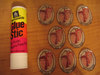
The first thing I did was make an Illustrator file with our logo repeated as many times as I could fit it on the page, while allowing for 30% shrinkage. We tried it on paper first (sorry about the flash--the glue stick is in there for scale).
That looked okay, so I set the printer to Draft (colors intensify with shrinking) and printed on a sheet of the plastic. I cut all the circles out, punched holes near the tops, and popped them all on a parchment-lined cookie sheet. Let me just say right now that the instructions on the Grafix Arts website have been updated since they printed the instructions that came in the package we bought. For instance, now they say the final product will be only 20% of its original size. This is information that would have been helpful to have. They also listed a wide temperature range for baking: 250-400 degrees.
I chose a temperature roughly in the middle (325), and put the circles on the sheet matte side up (mainly because then the printing was readable, so they seemed "right side up"). As I watched the shrinking action through the oven door, I kept waiting for the pieces to flatten out again. This is as close as they got:
I did try flattening them out with a spatula while they were still warm, without much luck. I also decided that I wanted to read the text through the shiny side of the finished piece, so I reversed my Illustrator document so that everything was backwards, and printed out another sheet of plastic. I also read the instructions again more closely, and noticed these tips: 1) "lowering the temperature will slow the absorption of heat, resulting in longer shrink time and reducing distortion," and 2) "curling and sticking can be minimized by putting a piece of heavy weight vellum or parchment paper on top of the piece while baking." Armed with this new information, I set the oven to 250 degrees and covered the pieces with another piece of parchment. Just for kicks, this time I tried baking the pieces matte side down, so that the words were still "right side up" on the cookie sheet. I figured the first way didn't work out, so this could only be better. I was so wrong. Here's what the second batch looked like:
First of all, I couldn't see the pieces through the parchment I had put on top, so I didn't know the extent of the problems until they had been in the oven quite a while. The pieces stayed much bigger, and curled up so tightly that flattening them out after cooling was completely impossible.
Determined not to waste another sheet of plastic, and kicking myself for not trying this right at first, I made several little test pieces out of scraps. I turned the oven back up to 375, and tried one matte side up and covered, one matte side up and uncovered, one matte side down and covered, and one matte side down and uncovered. The best piece was the one that had been baked uncovered and matte side up (like my first batch).
I steeled myself and printed a new page of tags on the plastic. This time I only baked three or four at once, so that I would have time to flatten them all out before they cooled down too much. I kept the oven at 375. Since the pieces never truly flattened out, instead I waited while they curled up like cups and then curled back down into little arches. Then as soon as I took them out of the oven, I turned them all upside down and smashed them down as flat as I could. Here's the final result:
They are still quite distorted--they started out as perfect circles, and now are decidedly oblong. Also, I feel a bit sheepish that it took three sheets of the film to get eight usable tags. Anyway, I think I have figured out the best method for this brand of film, but I'm still a bit disappointed. Shrink experts, advise me!
Posted by lisa at February 17, 2006 10:50 AMDon't mind the shadow of my hand holding the camera in every single picture. Sheesh!
Posted by: lisa on February 17, 2006 10:50 AMEven though they did not turn out perfectly round I think they turned out very cute.
Posted by: Marci on February 17, 2006 12:38 PM