
August 01, 2010
Lisa: Croquembouche
I had been considering trying my hand at making a croquembouche--which is a fancy French cake that is basically a tower of cream puffs held together with carmel and surrounded by a web of spun sugar--and Kaeleigh and McKenna's joint Great Gatsby birthday party (which I already mentioned in this entry on vintage hairstyles) seemed like the perfect opportunity. Plus, croquembouche is the perfect cooking project for me: impressive result, fairly easy to put together, and not at all practical or nutritive.
I was running super late for the party and trying to get out the door, so I didn't have time to take photos of the completed dessert. It was glorious, though. There were sparkles and sugar daisies. Anyway, I swiped a few pictures from Kaeleigh's Facebook albums that at least give pictorial evidence that my croquembouche really existed. (If you check out those photo albums, be sure to look for the Robert Redford movie being projected on one wall, which made an incredible backdrop.)
This entry from La Cerise was the most helpful when I was putting my croquembouche together. Lots of sites like this one will give you more help on how to make caramelized sugar if you haven't done that before, and I'll tell you my number-one secret to making this project super manageable and fun: frozen cream puffs from Costco. Yep. More info on croquembouche construction after the jump!
Here's what I learned when I made my croquembouche:
1. Unless you're a baking purist, just buy one big box of frozen cream puffs at Costco. Seriously, they taste fine and using them takes all the hard, boring parts out of this process. You can even just pull them out of the freezer and start assembling the tower while they're still frozen. By the time you're ready to serve (long before, probably), they'll be defrosted. I noticed that Astrid at La Cerise had frozen her homemade choux before assembling, which gave me the idea--and I wouldn't even have attempted to make a croquembouche without this shortcut. I am too afraid AND too lazy.
2. The paper cone upturned in a vase on La Cerise is genius--absolutely the way to go. I wish I had buttered mine so it would have slipped off a bit more easily.
3. Be prepared to work FAST. You have to keep the caramelized sugar warm enough to stay pliable without browning it too much. Have everything ready and laid out with a plan in mind before you start the sugar process, and don't leave the sugar cooking on the stove and go start working on your hair. Even if the sugar does get too brown, though (as mine did), all is not lost. It makes the finished caramel have a more crackly texture and a more bitter flavor, which is actually kind of good. The crunchier caramel is more structurally strong than the delicate cream puffs, though, so they're hard to get apart without bursting or breaking the puff. If that happens, just use a fork to break off a hunk of tower wall onto your plate. Problem solved.
4. Caramelized sugar burns like a mother, and you're reaching down into a paper cone with a handful of it and pressing it into a mass of more hot caramel. For heaven's sake, be careful and have some cold water nearby.
5. Strings of caramelized sugar get everywhere--when you're swooping each dipped cream puff over to your paper cone and especially when you're whipping a spun sugar cage around the finished product with a fork. Then those little strings harden like the candy they are and coat everything in your kitchen with a hard, sticky shell. I wish I had covered my work area with a layer of aluminum foil, like Chica and Joe did when they made the candy jewels for their incredible Princess Peach cake.
August 08, 2010
Lisa: One on One
Since I was trying out No-Spend Month back in June, I wanted to come up with a birthday gift for Angie that I could make myself, using mostly materials I already had on hand. One passing reference to Hall & Oates later, an idea was born.
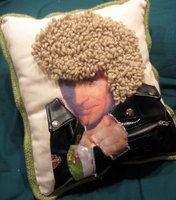
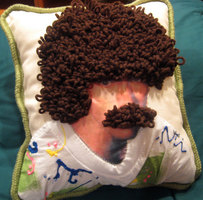
Here's the finished product: A throw pillow proudly featuring the head of Daryl Hall on one side and John Oates on the other.
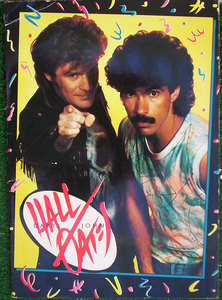
Here's the inspiration image I started with, showing our boys in all their '80s glory.
I tried to convince Sarah she needs a pillow with Horatio on one side and Grissom on the other, but she just said she hated me. Confusing. Anyway, more info on the process after the jump!
What I bought for this project:
needle punch tool (really too small for regular yarn)
Build-a-Bear faux leather Harley Davidson jacket
green lipcord trim (from JoAnn's but not online)
tiny iron (which I am taking back because it was crap and wouldn't get hot enough to transfer anything)
What I had on hand:
off-white cotton duck
printable iron-on transfer paper
poly batting
plain white toddler-size t-shirt
puffy paint
two colors of brown yarn
needle & thread
pencil
fabric glue
embroidery hoop (borrowed from Sarah)
Order of operations:
1. I traced the shape of the hair/mustache areas on the back of the fabric, and started needle punching according to the instructions included in the needle package. I adjusted my technique a bit to compensate for working with yarn that was clearly much too large for the type of needle I had. (There was more yanking the yarn through the needle and holding it in place in the fabric than there should have been.) After all the yarn loops were in, I drizzled fabric glue over the back side of those areas to anchor everything in place.
2. I splatter-painted Oates' t-shirt, and tracked down a mini leather jacket to cannibalize for Hall. I cut them apart, strategically placed things as best I could, and sewed them in place. The idea was to use three-dimensional materials to emulate a two-dimensional representation of a three-dimensional object, and it was as confusing as it sounds. I wanted to use the real neck trim, zippers, placket, etc., whenever possible.
3. After throwing out the idea of sewing with actual human skin I tried to iron the skin-area transfers directly to the spaces between the hair and clothing, and failed miserably. I had saved the iron-ons for last because I knew from washing Nora's pillowcase that the surface of the transfers can crack and scuff if they're messed with too much. This left me with some very tiny areas to try to press bits of transfer into (Sorry about your ear, Hall. It's not happening.). I thought a miniature iron was the answer, but it didn't get hot enough. My final solution was to iron the face and hand transfers onto another piece of smooth cotton fabric, and then to sew that fabric into place on the pillow sides. The look isn't as seamless as I wanted, but I think it works.
4. Once the pillow sides were done, I pinned the lipcord trim to one of the sides and sewed it in place with a zipper foot. (You might want to check out a tutorial like this one for more step-by-step help.) Then I pinned the two halves of the pillow together, right sides together, and sewed around the edges again, catching the lip part of the lip cord between them. I left a bit open for turning, flipped the whole apparatus right side out, and stuffed it with batting. Use small chunks of batting for a smoother pillow. Then I hand-stitched the opening. Voila!
August 13, 2010
Lisa: What you need? Baby, I got it.
It's taken me three weeks of swimming workouts to finally feel like I'm bringing the right stuff with me and that I haven't forgotten anything. If you're swimming (and showering) at a gym, this list might help you. Otherwise, it's pretty much just here for me, so that next time I get motivated I won't have to start from scratch.
Here's what to assemble:
- 1) Old messenger bag. It can really be any smallish bag. Dig around in the back of your closet. I bet you have something that will work. If it has a zipper pocket in front to throw your keys and wallet into, so much the better. The important thing is that you're not using this bag for anything else--you will want to just leave it packed with your swimming stuff all the time. The bag has to be big enough to hold...
- a) Padlock. You probably have one kicking around in a drawer from some kind of previous gym or school situation, but in case you don't (or you didn't write down the combination), Kmart has a bunch of options. Get one in your favorite color so it's easy to spot.
- b) Goggles are really important if you're going to be spending a lot of time in the pool. More important than I thought. I just got some crappy ones at Walgreens originally, but it only took me a few days to upgrade to a pair of Speedo women's Vanquishers, and I love them. Plus, I bought them at a great local swim shop (Poco Loco); the woman there was super friendly and helpful.
- c) Hanging toiletry caddy, which I thought I got at REI, but could just as easily have come from ShopKo or Target. You probably got one for traveling before the airlines started making you pack everything in clear ziplocks. The exact brand or type doesn't matter, as long as it's fairly small/basic, can get a little wet without getting ruined, and has a hanging hook. Mine also has a little mirror velcro-ed into the top that has come in very handy. Stock that baby up with...
- i) Travel-size containers of your face wash, toner, and moisturizer. Buy travel-size toiletries or find some tiny refillable bottles. Just test your bottles for leakage first.
- ii) Travel-size shampoo, conditioner, and body wash. Shampoo can be from hotels or the trial-size section of the store if you're not picky about your product, or fill up an empty bottle with your favorite. The conditioner tubes that come in hair dye boxes are a good size, if you do your own coloring. I think body wash is easier on-the-go than worrying about bar soap in a box. Use a small quick-drying puff or just your hands to lather up.
- iii) Disposable razor
- iv) Trial-size hair gel and wide-tooth comb
- v) Cotton pads, which you can use to apply your toner and then quickly sweep up your hairs that came out in the shower so you can throw them away when you get out. Nobody wants to step on someone else's hairs. I bought a little snap-closed plastic box of cotton rounds in the trial-size section, and I've been refilling it from my regular package.
- vi) Small deodorant and purse-sized perfume atomizer
- vii) Chapstick (Pool water is DRYING.)
- d) Cheap rubber flip-flops (try Target or Old Navy) to walk to and from the pool, and to wear in the shower. Fungus is not your friend.
- e) Small makeup bag (another thing you just have kicking around) containing...
- i) Redness-reducing eye drops. Especially important if your goggle situation is sub-optimal.
- ii) Backup makeup. If you're like me, you have a drawer of reject makeup products that you don't use every day. Dig out a passable mascara, some eyeshadow, and a lip stain (for example). The idea is to pack a bare-bones makeup kit that you can just leave packed in your swimming bag all the time. You don't want to be thinking what makeup to pack at 7 am or to find you've forgotten to bring something you need.
- iii) Wisps, in case you forgot to brush your teeth before leaving the house. It was early!
- iv) Feminine hygiene product of your choice. One or two should be enough for emergencies.
- v) Sample-size body lotion
- f) Refillable water bottle. You might not feel thirsty after swimming, but you are.
- 2) Plastic shopping bag. You know you have some from all those times you forgot to bring your reusable fabric bags into the store. Perhaps in your IKEA bag keeper? The night before you're going swimming, toss the underwear for the outfit you're going to wear into the plastic bag, and stuff it into your swimming bag. While you're taking your shower (in the tiny stall with no place to put down your stuff), you can hang your clothes in the bag on the towel hook so they don't get wet. Then when you've gotten dressed, roll up your swimsuit in your towel, and put the whole damp roll in the plastic bag to take home. (bonus: recycling!)
- 3) Swimming suit. If you have a fashion suit (like I did) you may spend your entire workout tugging it into place. I bought this old-lady skirted Speedo, and I kind of love it. I will admit that I sewed some low-profile bra cups into the lining for a bit of extra shaping and coverage. I think I saw what a difference that could make in my shirred halter-top suit, and I couldn't resist. Anyway, just wear your suit under your clothes on the way to the gym. Then you don't have that awkward moment where you're wondering if you should just get naked out in the open in front of the lockers, or go into a toilet stall ("but I'm not peeing!") or shower stall ("and I'm not showering!")
- 4) You will need a place at home to hang your swimsuit and towel to dry. This seems obvious, but putting on a damp suit is unpleasant. Rinse your suit out in the shower after you swim, and wash it on the weekends. Easy peasy!
August 24, 2010
Lisa: infomercials can be convincing
Me: I'm thinking of buying a shake weight.
Sarah: Bolsters your biceps and your sex life. Think of all the relationship bargaining power in your future.
Me: Clearly, they are a turn-on...as are taut upper arms.
Sarah: Ha!
August 25, 2010
Sarah: Urban Orangutan
Lisa's post about what to bring to the swimming pool reminded me that I'd learned a little about this topic a few weeks ago as well:
One of the amenities in my apartment/condo complex is a swimming pool, and I've been trying to take full advantage of this feature during the summer. Working without air-conditioning helps me stay motivated. As does knowing a cute little person that loves to play in the water. Over the course of the summer, I've spent evenings and weekends at the pool and only seen a few other residents: a young couple, a few parents with their kids, and one older lady that wanders the complex all day, watering the flower pots with a milk jug full of water.
Until now, dear reader. Until now.
I was sitting poolside on a Saturday morning when this orange-hued gentleman strolled in, supplies tucked under each arm. Don't worry, when he unpacked, I took a photo so that you, like he, can properly prepare for a day by the pool. I know, the water can be so unpleasantly wet and cool, but that beautiful, sun-reflecting pool will bring your suntan to a new level.
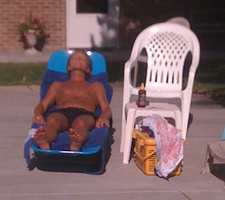
I call this instructional guide Operation Human Toast:
Pre-Pool Preparations:
1. A small swimming suit is a must. Black attracts heat, so that is clearly preferable.
2. Invest now in blond hair dye. Let the light yellow strands of your flowing locks be the yin to your darkening skin's yang.
3. Find a large plastic tote for your supplies. Your grandmother probably has one in her basement. Take a look.
4. Make a run to 7-11 for a Super Big Gulp. Probably diet soda. Obvs.
Pool-side Perfection: This will be faster with an illustration.
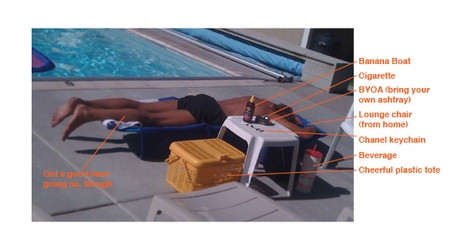
1. Suntan lotion. Bring it. If I have to tell you this one, you've already failed.
2. Cigarette. Summer in a desert state can be so frosty. Smoking will help you warm right up. Plus, your skin might not be wrinkling fast enough from the sun damage. This will help speed the process.
3. Bring Your Own Ashtray. The HOA has seriously overlooked poolside ashtrays. You might write a strongly-worded letter while you're laying by the pool.
4. Trust no one. The pool area may be scattered with chaise lounge chairs, but they're probably not good enough. Better to have a personal collapsible lounge chair specifically for tanning.
5. Bring your keys for the pool area, but keep it classy. Chanel keychains preferred, Fendi also accepted (not pictured).
6. Settle in for the long haul. You don't get this sort of burnt sienna glow by clocking in an hour here, an afternoon there. Purchase a beverage that reflects your commitment for a weekend-long tanning bender. Getting beautiful is thirsty work.
7. NOT PICTURED BUT VERY IMPORTANT: Boom box. Turn on some tunes. AM radio seems to suffice.
Invest in aloe. These words are scripture.
August 26, 2010
Lisa: Craft Lake City 2010
Sarah, Jeff, Nora, and I ventured out to Craft Lake City a few Saturdays ago. It was easily the best craft fair of the summer. Possibly the best craft fair of the state. NO, OF THE YEAR! Okay, to be honest I'm not really sure what the competition is or what I'm talking about, but what I'm trying to say is that Craft Lake City is awesome and we had a great time.
As you can see, I held back and only bought two things this year. The booths were just as great, but...blah, blah, times are tight, etc. ANYWAY. The adorable crayon roll is from Urban Patchwork. Here's her Etsy shop (no crayon rolls) and blog. It was tiny bit pricey, but I couldn't resist; it's so beautifully made and handy, too. So much sweeter than collecting the crayons at the bottom of my purse into a ziplock bag. (Isn't having a kid glamorous?)
The pink flower earrings are from jellabee; here's her blog and Etsy shop (and another one here for her cute kids' stuff). I wish I could find some evidence of this type of jewelry in one of those spots--she had tons in her booth, and I've already had people ask where I bought my earrings. (ETA: On further investigation, it looks like you can just buy the flower cabochons and then glue them onto posts or bobby pins or whatever all by yourself. Easy peasy.)
The last photo of me and Nora is at the fun kids' activity booth, where we made a bird feeder out of an old milk jug. Despite her serious expression, Nora loved gluing on the pompoms and paper shapes. The result is hanging in our backyard--just because the birds seem to find it repellent doesn't mean we won't treasure it (at least for a few weeks).
I also picked up cards from Easily Amused (super cute softies!), babyGgear (that orange sock monster is still calling to me), and Vintage Fern (charming and cheap appliqued dish towels would make great hostess gifts!).
I noticed It's the Little Things had a booth again. This time, some flower headbands that I don't see in their shop caught my eye. I thought I was being so good, keeping my purchases to a minimum and taking cards of things to consider later, but very few of the artists have much stock in their Etsy shops--and the selection is always narrower than it was at the fair. Next year I'll save my pennies in advance and just go ahead and buy the things I like.
I coveted the stuffed sewing machine in the Nifty Kidstuff booth (again) after looking at it periodically online all year, but it's still just too pricey for me to consider buying for Nora. Maybe it's more of a grandparent thing to spend $60+ on a child's stuffed toy. Similarly, on our way out, Sarah spied these gorgeous tote bags with awesome interior pockets made from adorable Japanese prints from Elsa Bags (sorry, that particular bag isn't in her shop). Again, I wish I was the type of person who had $80 to drop on a cloth tote bag, because these really are beautiful.
I also loved the hand-embroidered skirts from Cory Bushman of Songs of the Sea. They're thrifted pieces that are cleaned up and then stitched with quotes from Tolstoy (among others) and whimsical graphic designs. Each one is completely unique and just incredible. I should have taken the time at her booth to search through and see if there were any at all that would have fit me, because her Etsy shop is empty and her blog hasn't been updated in a year.
Also: these are the Japanese-fabric-covered-button barrettes I bought last year but couldn't source. Apparently the mysterious "am" stood for Anne Michelle.
If I had one suggestion for the organizers of Craft Lake City, it would be to better publicize the artists. In the fair's program, artists are listed alphabetically by name, but most booths have a shop/brand name that they publicize. If you know one but not the other, there's a disconnect. I also asked three employees where I could find the Beehive Bazaar booth (I knew they were listed as a sponsor and must be there somewhere), but nobody knew where to find them and there didn't seem to be any way to look it up. Including a map, shop names, and even artists' websites in the program would be super helpful.
To the artists: please, PLEASE brand yourself in a memorable way, have cards that are easy to grab, and then have something waiting for the people who take the time to track you down online! I can't be the only person who went to Craft Lake City, saw something awesome that I didn't get, and wanted to fix that a week later.