
May 01, 2010
Lisa: hair-suit
I have naturally wavy/curly hair, and since becoming an adult my attitude has swung like a pendulum between the extremes of 1) celebrating curly hair and decrying the media position that wavy hair is ugly and messy, and 2) forcing it into smooth submission. Recently, I tried a modified version of the "curly girl" method for a while, but now I've swung back into something more styled--using hot rollers regularly. My dad asked if I started doing my hair differently to distance myself from my billboard doppelganger, but it's probably more a case of just getting bored with having the same look every day. Plus, I've been getting more into retro looks lately, and the only decade my natural hair is reminiscent of is the 1980s. Hot rollers are actually surprisingly fast and low-maintenance. There's no tiresome (and damaging) blow-drying or flat-ironing, either; the rollers are my only straightening agent.
But...remember how I couldn't stop raving about Grey Gardens yesterday? Sarah could testify that a good part of what was making me drool with each new outfit was Drew's fabulous 1950s hair.
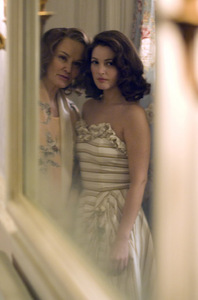
Barring having a team of experts on hand for styling and touch-ups, what do I need to do to get my hair to look like that? Online research suggests having my hair cut specifically for curling--the words 'wedge cut,' 'undercut,' and 'double cut' have been thrown around. But how do I convince my much trendier stylist (who seems to give me a mullet no matter what I ask for) that this is what I want? Salt Lake City isn't exactly full of salons that specialize in retro cuts.
In the meantime, YouTube is a great source for instructions and tutorials for retro hairstyles. I've been wearing a modified version of this easy pin-up "pomp" fairly often. (You can see it on Facebook here, here, and here.)
I also tried out this faux finger wave bob for Kaeleigh's Great Gatsby party (photos on Facebook here and here) and I was really happy with how it turned out and how easy and approachable it was compared to doing real finger waves. I think the key to shiny hair with the waver is Redken Spray Starch (mentioned in the video), which is tricky to find in stores these days, but gave me a much better result than my Britney concert attempt. I also didn't bother straightening first, but just brushed out pieces of that day's curly style and mashed them into the waver's hungry jaws.

Next up, I want to try some real victory rolls, or maybe this victory rolls and ponytail combo that is supposed to be good for second-day hair. But...that's not really what my hair looks like on the second day after washing at all. Maybe I need to do some more research. Or maybe the texture difference is a result of pin-curling instead of using hot rollers. I think I'll try one of these two videos to set in some pin curls, and see what happens. The part two videos from both of these channels is making me think I need to buy a new brush first, but I can handle that.
Last but not least, four blogs I've read in the last two weeks have recommended a book called Vintage Hairstyling: Retro Styles with Step-by-Step Techniques by Lauren Rennells (check out her blog here). I wish my library had it, so I could check it out right now. As it is, it will probably languish on my wishlist for a while. But who knows? I may break down and need something to hold me over until Dita's book comes out.
May 04, 2010
Lisa: sexy?
Sarah sent me the following text messages yesterday:
Sarah: I can hear Rocco humping his bed and it is...intimate.
Lisa: Ew.
S: I. Know. But who am I to say stop? He deserves a fulfilling life? Ugh.
L: Ew! But...dogs don't wear condoms, so I guess it is the more responsible choice.
S: Dogs also don't have the only 100% effective form of birth control: Levis.
L: Good point.
Later...
S: Aaand I now have Showtime.
L: Your TV situation confuses me.
S: Me too! Anyway. You should come over sometime. I bet we could see some titties.
L: Who doesn't like a good pair of titties?
S: They're the Sara Lee of anatomy.
This morning during the Diane Rehm show, I heard a radio commercial I had to investigate further. It was for PajamaGrams (now including pajama jeans!) Apparently, 'the gift of relaxation' is great for Mothers' Day. For a mere $45 - $75, you can have the loungewear of your choice delivered in a periwinkle or pink organza hatbox. (Yep. Organza. Hatbox.)
The good news is that pajama jeans (essentially wide-leg "jeggings" as far as I can tell) are still a 100% effective form of birth control: not because of their sturdy fabric and construction, but because no one wants to become intimate with someone wearing a pair. And can we just revel in that trademarked fabric name for a moment? DORMISOFT. I'm not going to say that this particular garment symbolizes the downfall of society, but...it is clearly a gift for someone you hate.
May 05, 2010
Lisa: Plain Jane or Wacky Sailor?
I just finished making a skirt with this gathered skirt tutorial from Gertie's NBfBS (which I just wrote about a few days ago). I'll put more details about my skirt-making process after the jump, in case anyone is interested, but meanwhile I have a pressing question for you. A question involving yellow-gold rickrack. And a hot pink petticoat.
Exhibit A (sorry about my ironing issues):
Exhibit B:
I love the skirt's shape with the petticoat, but is it too much? Is it the pink that makes it too much? Or is the pink only too much when combined with the yellow rickrack? I like the rickrack because it is oversized and fun and gives some interest (and a little more fullness) to the plain skirt, but does it make the previously perfectly serviceable skirt tacky and ridiculous? I was thinking about a possible nautical vibe to go with the navy skirt fabric, but then I sort of lost control in the aisle with the gold trims. Maybe the idea of trim is good, but the yellow rickrack is the wrong choice. Or maybe I should whole-hog it and throw some gold anchor buttons on the waistband. I fear I have completely lost perspective.
Here comes the important bit: please help me end this madness and vote on your favorite version!
One of the things I liked about Gertie's tutorial is that there is no pattern to buy! You just take your measurements and plot out some rectangles. Finding some 100% cotton fabric that was around $1/yard (in the form of a clearance duvet cover at Bed Bath & Beyond) meant an almost free sewing project--the exact opposite of my usual undertakings.
Since I didn't have much to lose, I also tried out a few new techniques and used THREE specialty presser feet for my machine! Of course, I jumped on the opportunity to use my new ruffler foot. I had to fiddle around with it quite a bit and do some test ruffles to figure out what settings I needed to make the 80 inches of skirt fabric gather down to the length of my waistband, so it probably didn't save me a lot of time in this case. I wrote down the settings on my homemade pattern, though, so next time should be faster.
I also used the blind hem foot that came with my machine for the first time (following this great tutorial). My hem isn't as invisible as I'd hoped, but I think that was the fault of user error and some possibly sloppy folding. When I get the technique down better, I think it will make a very professional-looking blind hem --great for big skirts that would take yards and yards of hand-hemming.
Lastly, I pieced together my crappy-but-functional plastic invisible zipper foot and set in a zipper with this tutorial. I don't know what crafters did before the internet.
Verdict: I will DEFINITELY be making this skirt again. It's a relatively easy, flexible project, with a cute, wearable result. Maybe next time I'll use a border print or a stiff taffeta.
May 28, 2010
Lisa: Tools of the Week
I consider myself fairly lipstick-impaired. During my formative years, the vast majority of my dress-up occasions involved playing the flute--an activity I cannot perform while wearing lipstick. It wasn't until I saw photos of myself singing with Voices as an adult that I realized lipstick is the only thing keeping me from looking like a particularly lipless decaying corpse. Unfortunately, the only decent lipstick I have owned for the last 10 years or so is an old tube of Clinique Plum Brandy that I'm sure I stole from my mom. It was time for me to woman up, do a little research, and take the plunge. Here's what I found.

The internets told me that matte lipstick is the best for vintage looks, but there aren't many drugstore-level choices around nowadays. This is a good option to try, to see if you like the effect before you spring for MAC or something even more glamourous. The color I bought is In The Red, which is a bit more on the orangey side than I expected from seeing it in the tube. I still like the color with the right outfits, though, and I love the texture, especially when I first put it on. It does get eaten off my lips pretty quickly, but I think that might happen with all lipsticks. Anyway, it's a bargain at $6 for a pack of two through Amazon right now, so you can afford to reapply as often as you like.
OBSESSIVE COMPULSIVE COSMETICS LIP TAR
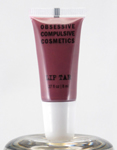
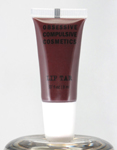
YouTube makeup tutorials convinced me I had to try these. At $12.50 apiece, they're not as cheap as the Revlon lipstick, but still somewhat reasonable. Plus you only use a teeny bit at a time, so the tiny tubes should last a long time. Lip Tar (which does not contain actual tar) applies wet like a gloss, but is highly pigmented like a lipstick. Both of the colors I tried (Plum and Vintage) are great: dark and rich with a shiny finish. The plum looks pretty improbable in the tube--it's really bluish--but on, it's awesome in a vampire-y sort of way. Lip Tars are really made to be mixed with powder pigments or with each other to create custom colors, but I'm not that advanced yet.
There's definitely some feathering action with the Lip Tars, which I think is more common with lustre-finish lip colors, but that can be minimized by layering over a base of lipliner. It helps with darker/brighter lips also to create a really sharp lip line with concealer and a brush on the skin around your lips. I did find that the pigment of the Lip Tar sort of sinks into the cracks in your lips, so that when the main surface of the color gets eaten off, you're left with a really bizarre Jack-the-Pumpkin-King kind of look. A little more Lip Tar or even just some lip balm smeared around to pick up and spread the remaining color can salvage things.
So. That's what I've been playing with so far. What's your favorite lipstick?
May 31, 2010
Lisa: Office Redo (part deux)
When I left my job at the library to work at home on Concert Black, I decided it was time to give my closet office a makeover. It was functional before, and I still liked the idea of an office using unexpected space that I could hide behind doors, but I thought it might be soul-killing after a while if I actually felt like I was going to work in a repurposed closet.
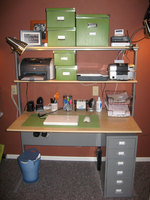
I had a gallon of paint sitting around that I'd bought with the idea of painting the sewing room--until I figured out that bright coral pink was a terrible choice. I took the paint back to Home Depot and had the paint guy add in some new pigment to create a usable color. He was great, giving me helpful advice about what colors we could reasonably get without overflowing the can. We ended up with an inoffensive warm dark brown--probably not something I would have chosen originally, but I think it works really well in the small space of the office.
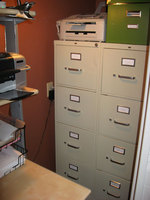
The desk and shelving and a lot of the accessories are from IKEA, and I did a ton of measuring and planning on the IKEA site and with an employee in the store before I bought everything. Unfortunately, I still ended up with some shelving pieces that wouldn't work in the tight space I had designated for my "shipping station" (on the left in the photos below). I dragged Nora back to the store by myself and manhandled her and a bunch of really long pieces of steel, with only one minor altercation with an IKEA employee. Marci's dad lent me a Sawzall, and I cut down some of the new pieces to the right size before assembly. Success!
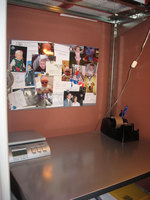

Better, right? So, why did it take almost two years for me to blog about this? Because that's how long it took me to hang that magnet board on the wall.