
November 23, 2012
Lisa: Skating in New York City
Since I just had my 34th birthday, I've been working on my 35 x 35 list, crossing off things I've done and gearing up for things I want to try to accomplish this year. In doing so, I realized that (like most of what I've done in the last few years) I never blogged about visiting New York over New Year's at the end of 2009. I did hastily throw up some photos on Facebook. Anyway, I'm not going to blog about the trip today, either--but I AM going to post about crossing something off my list while we were there.
12. Ice skate at Rockefeller Center.
Because my family is adorably supportive, they didn't tell me right away that trying to skate at Rockefeller Center was a terrible idea. On our third day there, after standing in line for the ticket lottery for In the Heights, Dave and Angie took me, Blake, Nora, and Sarah to see the giant Christmas tree at Rockefeller Center. That's when I saw this:
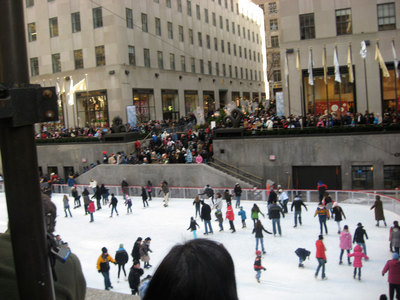
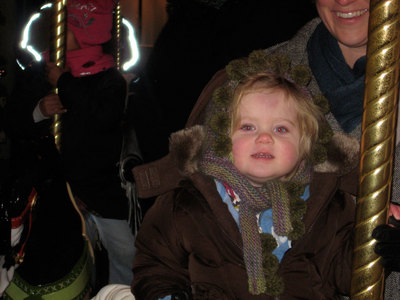
Yep, all those people packed in at the side of the rink there are waiting to skate. Now, I love skating, but I hate crowds. And it was freezing cold. And we had a little two-year-old Nora with us, who refused to wear gloves. It was time to modify the goal. Dave heard there was a skating rink at Bryant Park, so after Sarah and I were finished with the play we met up with the rest of our group there. Guys, the wait was two hours minimum, it was even colder than it had been when the sun was out, and we still had a toddler in tow. We gave her a ride on the carousel, and then ran for the warmth of the New York Public Library to reassess.
Dave and Angie knew of one more skating rink, this time in Central Park--walking distance from their neighborhood. Sarah and I decided to wake up early and hit the rink first thing, without dragging Nora along. Even when we looked out the window and saw this, we stayed strong:
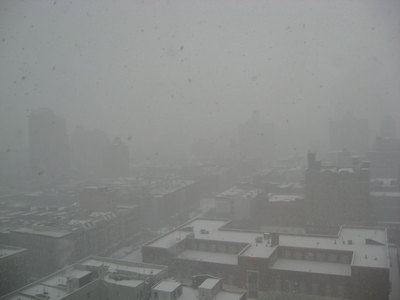
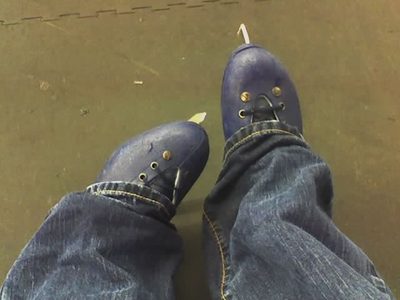
We couldn't figure out the park signage, and blundered around the completely deserted park in the snowstorm for an hour before we happened upon the Wollman Rink, which was miraculously open and staffed in spite of the weather (and the fact that it was New Year's Eve). We ignored the naysayers, rented our skates, and clomped through the empty (but still smelly) locker room and out onto the ice. The snow stopped, the clouds parted, and we skated for an hour in front of the New York City skyline. Mission accomplished, and back in time for brunch.
November 04, 2010
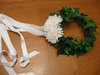
Lisa: vine house
I think instead of building a treehouse, I want to build a vine house like the one we saw at Red Butte Garden. Here's what I'm thinking:
1) We were going to have to build a fake treehouse anyway, sort of more of a playhouse up on stilts NEXT to a tree, since we don't have any backyard trees large enough to support a real treehouse. This way we're not dependent on trees.
2) It's got to be cheaper and easier to build than a treehouse, since there's a lot less wood involved and the walls and roof are mostly chicken wire. Plus there's no floor, just packed dirt.
3) It still feels cozy and private for kids, but parents can keep an eye on things through the walls, and you don't have to climb any ladders to extract reluctant kids, a la the McDonald's playplace.
Next up: research. Are there kits you can buy? I love the curved shape of those rafters, and that might be a bit beyond my woodworking abilities. Also, I might need to make another trip to Red Butte with a measuring tape. Who wants in?
August 08, 2010
Lisa: One on One
Since I was trying out No-Spend Month back in June, I wanted to come up with a birthday gift for Angie that I could make myself, using mostly materials I already had on hand. One passing reference to Hall & Oates later, an idea was born.
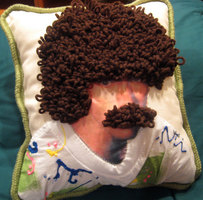
Here's the finished product: A throw pillow proudly featuring the head of Daryl Hall on one side and John Oates on the other.
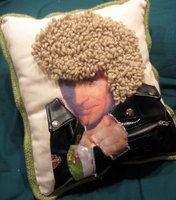
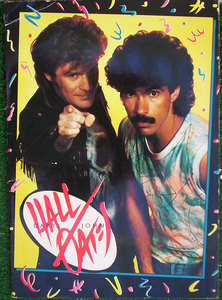
Here's the inspiration image I started with, showing our boys in all their '80s glory.
I tried to convince Sarah she needs a pillow with Horatio on one side and Grissom on the other, but she just said she hated me. Confusing. Anyway, more info on the process after the jump!
What I bought for this project:
needle punch tool (really too small for regular yarn)
Build-a-Bear faux leather Harley Davidson jacket
green lipcord trim (from JoAnn's but not online)
tiny iron (which I am taking back because it was crap and wouldn't get hot enough to transfer anything)
What I had on hand:
off-white cotton duck
printable iron-on transfer paper
poly batting
plain white toddler-size t-shirt
puffy paint
two colors of brown yarn
needle & thread
pencil
fabric glue
embroidery hoop (borrowed from Sarah)
Order of operations:
1. I traced the shape of the hair/mustache areas on the back of the fabric, and started needle punching according to the instructions included in the needle package. I adjusted my technique a bit to compensate for working with yarn that was clearly much too large for the type of needle I had. (There was more yanking the yarn through the needle and holding it in place in the fabric than there should have been.) After all the yarn loops were in, I drizzled fabric glue over the back side of those areas to anchor everything in place.
2. I splatter-painted Oates' t-shirt, and tracked down a mini leather jacket to cannibalize for Hall. I cut them apart, strategically placed things as best I could, and sewed them in place. The idea was to use three-dimensional materials to emulate a two-dimensional representation of a three-dimensional object, and it was as confusing as it sounds. I wanted to use the real neck trim, zippers, placket, etc., whenever possible.
3. After throwing out the idea of sewing with actual human skin I tried to iron the skin-area transfers directly to the spaces between the hair and clothing, and failed miserably. I had saved the iron-ons for last because I knew from washing Nora's pillowcase that the surface of the transfers can crack and scuff if they're messed with too much. This left me with some very tiny areas to try to press bits of transfer into (Sorry about your ear, Hall. It's not happening.). I thought a miniature iron was the answer, but it didn't get hot enough. My final solution was to iron the face and hand transfers onto another piece of smooth cotton fabric, and then to sew that fabric into place on the pillow sides. The look isn't as seamless as I wanted, but I think it works.
4. Once the pillow sides were done, I pinned the lipcord trim to one of the sides and sewed it in place with a zipper foot. (You might want to check out a tutorial like this one for more step-by-step help.) Then I pinned the two halves of the pillow together, right sides together, and sewed around the edges again, catching the lip part of the lip cord between them. I left a bit open for turning, flipped the whole apparatus right side out, and stuffed it with batting. Use small chunks of batting for a smoother pillow. Then I hand-stitched the opening. Voila!
February 14, 2010
Lisa: platters
This is the present that ate Christmas. I don't know why I thought it would be really easy and inexpensive to just throw together a homemade pottery platter for my mom, but I did. Ignorance is bliss, I suppose. On the bright side, 1) she ended up with two awesome and humongous new platters to replace some that went missing from storage, 2) I got to force Sarah to spend a lot of quality time with me, and 3) I think I also get to check "sign up for a pottery class" off my list.
We didn't get any photos of our first session at Rob's studio, but we spent a lot of time squeezing blocks of clay into flat slabs, cutting those into circles (for the platter bases), turning those on the wheel and scraping them with spirals, extruding more clay for the platter sides through a homemade template on a Play-Doh contraption on steroids, and painstakingly attaching and shaping the sides on the wheel.
Rob let the platters dry in his studio for a while, and then put them through their first firing. He's the one who suggested we make two platters--so that if one broke in the kiln, we'd still have a presentable gift for my mom. Rob's watchful eye and expertise kept them both intact, and I brought the fired platters home and sanded off the really rough bits.
Back at the studio for our second session, Sarah (who was really sick and a SUPER good sport) and I chose glaze colors and mixed them up by hand while Rob built a form to hold the glaze. It had to be wide and deep enough to dip the platters into, but also maximize the amount of glaze we had. There is a surprising amount of math that goes into pottery-making. We wiped down the sanded platters and carefully dipped them into the glaze. While they dried a bit, we bailed gallons and gallons of glaze back into the garbage-can storage bins. Then we had to scrape the glaze off the bottoms of the platters so the final firing wouldn't melt them onto the kiln shelves.
Rob put in one more marathon kiln session, and the platters were done! Dishwasher, microwave, and even oven safe (if they would fit in any of those handy devices), and large enough to serve four children...to a table of hungry child-eating monsters.
Thank you again to Rob Marquardt, scientist-artist, and most of all to Sarah, for helping me to bring even my most ridiculous ideas to fruition.
February 13, 2010
Lisa: A New Hope
These gifts for the Bossyths (that is, the beautiful and talented Valori, Jillian, and Kaeleigh) were some of the first I decided to make, and some of the last to be completed.
Perhaps I should explain. 1) The Bossyths love costumes more than anyone else I know. It only seems fitting that they should own one of the most iconic costumes in cinematic history. 2) I happened to already own a very large quantity of stretchy white fabric. 3) Everything is more awesome in multiples. 4) Wouldn't you enjoy arriving at Yuma Haus for a night of relaxed TV viewing, only to find one of the ladies of the Haus lounging in a Leia costume? I thought so.
I improvised a pattern using this helpful advice. I ran into trouble twice: once when I cut the neck openings too large (right after being specifically instructed not to) and again when I left the main body of the dresses twice as wide as they needed to be. Thank goodness, both errors were ultimately fixable.
You can see photos of the ladies good-naturedly wearing their costumes here (on Facebook) or here. E made the awesome matching belts as her gift.
February 12, 2010
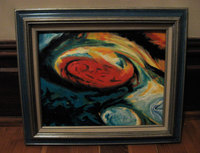
Lisa: The Eye of Jupiter
For my dad the painting lover, I finished an oil painting I'd started years ago. I realize that space photos are an odd subject for such a traditional medium, but something about the layers of gases around the Great Red Spot reminded me of brush strokes in thick paint. Plus, I think images that seem abstract but are actually realistic are kind of fascinating--maybe I can attribute this to reading Powers of Ten a million times as a kid. Whatever. Clearly I cannot articulate this in an intelligent fashion. Also, sorry about the lackluster photography.
February 11, 2010
Lisa: purse-frame clutch
I meant to post a few blog entries while we were in Spring City for the holiday weekend, but my cute family (and The Invention of Lying) seemed more important at the time. What do you say we just back-date a few entries, get caught up, and pretend this little lapse never happened? It's not like these Christmas present entries aren't already a month or so overdue.
I decided to make Marci a purse-frame clutch, which is another project I've been wanting to try. I started with this purse frame, which I found on Etsy. It was very important to me to find a kiss lock frame with really big balls. I tried looking around for patterns, but I guess there's just too much variation between purse frames for a traditional pattern to work. I ended up following this tutorial from U-handbag instead.
The black-and-pink tweed fabric and the pink lining were from my stash, and I bought some Platinum Bond Super Fabric textile adhesive to glue the fabric into the frame. The gluing was by far the trickiest part of making the clutch. Tucking the fabric edges into the frame opening and getting them all to stay in at once without getting gobs of glue on the rest of the purse fabric was almost impossible. I ended up using the end of a metal knitting needle to poke things into place, and luckily the dry adhesive can be picked off the metal frame.
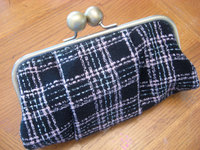
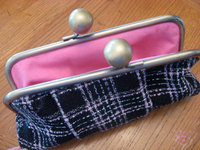
A little more thoughtful measuring would have served me well here, and I think I also made things more difficult for myself by using thicker fabrics and by deciding to add pleats at the last minute--which made things thicker and even less exact. The sewing involved is really easy, though, and a clutch is really small and can be finished quickly. Quick projects are so satisfying.
February 10, 2010
Lisa: a cunning piece of knittery
I made this Jayne hat for my "shiny"-saying baby brother, Jeff. He didn't recognize it immediately, which I admit did make me doubt his Firefly credibility a tiny bit. I didn't doubt the accuracy of my hat replica, because it is clearly spot-on.
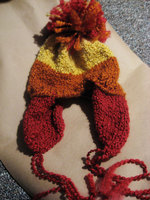
I used this pattern from Heather on Craftster, which was great. The yarn is Lion Brand Homespun, which is the only thing the regular craft store had that was rustic enough and came in remotely close colors. I've had a lot more knitting experience since last time I used Homespun, and besides, I'd say the yarn is easier to knit with than to crochet with. When you're crocheting, you have to figure out what loop to pick up from the mass of your project; with knitting, the loops are already on the other needle. Anyway, since I had to buy three huge skeins, I probably could have spent less on something more appropriate at the real yarn store, but whatever. Jayne hats for everyone!
I am notoriously bad at checking my gauge, and I was worried the hat would turn out way too big for Jeff's smallish head, but it was perfect! Jeff even humored me by wearing his hat everywhere he went for an entire week.
February 09, 2010
Lisa: feather earrings
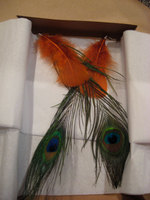
Mallory's present was another one that could have used a bit more advance planning.
I decided to make her some crazy feather earrings, which I've seen around a lot (most notably on the lovely Jillian), and I just grabbed some feathers and jewelry findings at the craft store and figured I'd wing it.
Luckily, I tried on my first attempt before wrapping the box. They went down past my boobs. Now, maybe if you are Jillian you can pull this off, but I think it takes a certain level of commitment to accessorizing that I wasn't sure Mallory shares.
I ripped them apart carefully, cut the feathers down several inches, and tried again.
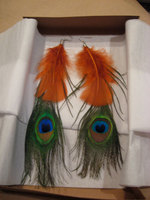
I didn't take a photo of my third version, which came about because I remembered after wrapping the box that Mallory doesn't have pierced ears. Luckily it's not hard to swap out hooks for clips. If you think about these sorts of things before you start, though, this project is easy and fun! I want to make a pair for myself now.
February 08, 2010
Lisa: Laptop Sleeve
You guessed it, another homemade Christmas gift! This one was for Angie.
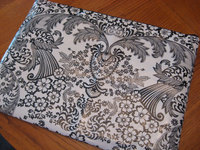
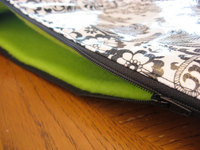
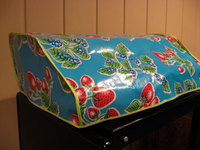
I had been thinking about making a minimalist laptop sleeve, possibly out of pretty oilcloth, when I saw this one at geeksugar. It was exactly what I had in mind: no fussy extra handles or pockets, just a pretty, slim sleeve that would protect her computer inside another bag.
I struck a deal with Sarah for a piece of her Corner Station oilcloth (which is exactly the same print as the one in the article photo), and purchased a pattern I thought would work from Etsy.
The pattern--from Sew Spoiled--is great and easy to sew. Overall it was clear to follow and I was happy with the result. I had hoped the sleeve would fit a bit more closely, like the one in the geeksugar photo, but it has a little extra room. At least this way the zipper won't scratch Angie's laptop, and maybe she can throw in a little makeup bag for cords and a USB key or something.
My major regret is that I didn't choose more carefully the way the pattern would lie on the outside of the sleeve. I was so concerned with using as little of Sarah's oilcloth as possible that I didn't even check what the squares I was cutting would look like. On the pieces I ended up with, the arched feather motif seems VERY prominent (and Angie is not what I'd call a bird lover), and it's a little off-center as well. She was really sweet about it, though.
I do like the bright green fleece I found for the lining, and using fleece kept things cushy and protective--minimizing the repercussions from my not interpreting "heavyweight fusible interfacing" in the instructions as "fusible fleece."
Like a lot of my handmade gifts, I'd say this project was generally a success, but there are a few things I would change if I were to make it again. If only I could have made rough drafts for each present! Angie (or anyone else) if you want a revised version in time for the next appropriate holiday, let me know.
February 06, 2010
Lisa: book character softies
When I saw this adorable dollhouse created for homemade versions of Lauren Child's Charlie and Lola on sweet sweet life (found, I think, via loobylu), I knew Nora had to have her own Charlie and Lola dolls.
From there, things sort of spiraled out of control, and she had to have dolls of ALL of her favorite book characters. Luckily, it was harder than I thought to find suitable illustrations of the characters standing alone in a way that made sense for being cut out of context and played with, so the pool was limited a bit. As you can see, we also ended up with George and Martha, the Powerpuff Girls, Cynthia Rylant's Hansel and Gretel, the No No Yes Yes baby, Alice, Eloise, and Edith.
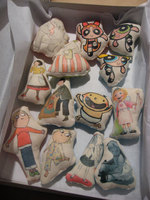
I scanned the images from Nora's books and printed them onto iron-on sheets with my hand-me-down inkjet printer. I love printable iron-ons, and I always keep a few packs on hand for spontaneous crafting. Anyway, I ironed the images onto some off-white cotton duck I already had--actually some old curtains from our first apartment--and cut matching backs out of a set of coordinating fat quarters from JoAnn's. You can kind of see the backing fabrics in this photo:
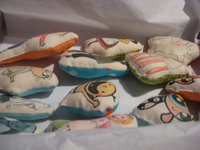
Nora's still a bit young for her dollhouse, but I think the more she gets into it, the more these little softies will get used. And they're so easy and inexpensive to make, I could always add in a few new ones (maybe even mini family members?) to keep things interesting. Plus, I like the idea of incorporating her favorite characters but retaining the feel of a homemade, non-commercial toy.
February 05, 2010
Lisa: Voices Photos
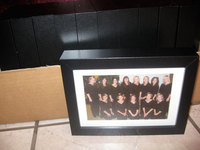
I got to use my trusty photo printer for another Christmas gift--framed photos for the girls in Voices, the a cappella singing group I joined in the fall.
First, I made Sarah come to one of my concerts, with the express purpose of taking a workable photo. She performed admirably. Next, I got rid of red-eye and flash-related clothing transparency in Photoshop (very advanced for me).
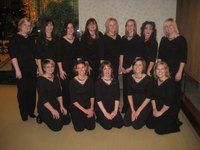
I printed the photos and put them in a bunch of RIBBA frames I found at IKEA, and finished them off with a raffia bow. Easy peasy--and I think it definitely counts as homemade.
February 04, 2010
Lisa: Model Train Photos
My father-in-law has the most incredibly intricate display of model trains that I have ever seen. He has been asking me for years to take photos of all his trains and the little vignettes he has set up, so that he can a) have a record of them in case he ever dismantles things or starts over, or b) write an article about them for one of his beloved train magazines. This Christmas, I finally got around to taking the photos, and I think it was the most well-received gift I have ever given.
I took about 70 photos and burned them onto a CD, printed around forty of the good ones on my little 4x6 photo printer (my second-best Ebay purchase ever), and got three 8x10s of my favorites printed at Walgreens. Bam. Favorite daughter-in-law of all time.
Not bad for a point-and-shoot, right? Plus, it was fun to take the real version of these photos.
February 03, 2010
Lisa: Typewriter Cover
Another homemade Christmas gift for you today!
For Sarah, my favorite typewriter collector, I made an oilcloth cover for one of her typewriters. She and I bought matching IBM Selectrics at a county surplus sale, so I had a handy-dandy model at home to try the cover on.
My Selectric came with the standard-issue black plastic cover, which was getting brittle and had a few holes in it. I carefully cut the original cover apart along the seams and used it as a pattern for the new one.
The oilcloth is from the adorable Corner Station, and I'd been hoarding it until I found the perfect use. One precut piece was exactly enough for two typewriter covers--so I made one for Sarah and one for myself to replace the one I cut up.
The super-skinny bright green binding tape is from JoAnn's. I forgot to bring a scrap of the oilcloth with me to match when I picked it out, but I think I actually like it better less matchy-matchy.

February 02, 2010
Lisa: Nintendo Cross-Stitch
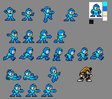
My decision to make all homemade Christmas gifts this year gave me a great excuse to try some crafts I've been wanting to do and to finish some projects I'd started and then abandoned. These cross-stitched dish towels featuring classic Nintendo characters are one of the latter.
With their matching gun-arms, I always thought Samus and Megaman would make a cute couple. Almost as cute as Angie and Dave, who I hope are using these towels in their tiny kitchen right now.
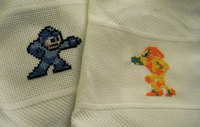
The cross-stitchable towels are available at most craft stores--I think I got mine at JoAnn's. For the patterns, I found pictures of the 8-bit characters online (try looking for game packaging and sprites), and then mapped the pixels out on graph paper as best I could.

April 23, 2009
Lisa: little bunny foo-foo
It's hard for me to believe that Nora is old enough to notice what holiday it is and if she gets a present or not--but this Easter I had to face the facts. Since Blake is pretty adamant that Nora not eat candy (and I'm not actively encouraging candy either), I wanted to make her something special that would take her mind off the lack of chocolate eggs.
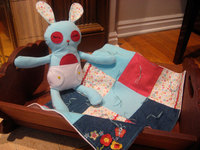
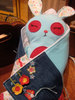
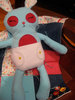
This little bunny and her blanket are made from this mmmcrafts pattern, and are sewn from some of Nora's outgrown baby clothes. I used felt, embroidery floss, thread, and batting that I already had, so the only thing I had to buy was the pattern itself. My dad made the cradle for me when I was a baby, and my mom brought it up from Spring City so that I could pass it on to Nora. Tender, right? I mean, I'm pretty much the best mom ever, wouldn't you say?
Unfortunately, my gift was completely overshadowed by the gigantic pink plush Care Bear Nora's great-aunt bought her at a secondhand store. Nora tackled that thing and rolled around with it, giggling and giggling. Ah, well. Maybe this sleepy little homemade bunny will grow on her.
(Oh, and if you think that I copied Angie's wedding colors, then all I can say is thank goodness I have people with really good taste to mooch off of.)
January 26, 2009
Lisa: Pork Roast
Remember how I'm trying to find main-dish recipes that I can memorize and make regularly? Well, I think this pork roast is easy and delicious enough that it might fit the bill. It's the first crock pot recipe I've tried that I'd classify as an unqualified success, and there's no sign of my pet peeve of crock pot dishes--the instruction to brown the meat before putting it into the crock pot. To me, the whole point of crock pot cooking is that the recipe is super easy and basically preps/cooks itself while you're at work or whatever. If you have to spend a bunch of time getting everything ready to go in the crock pot (including cooking things on the stove), then you might as well choose a regular recipe that doesn't take four hours to cook.
But I digress. Aside from adding a bit of cooking time--I think every crock pot is a bit different--and wishing I had one of those handy gravy-fat-separator dealies, I hardly had to think about it. If you decide to make this (and I think you should), save yourself a headache and cut the roast into nice slices with the electric knife when you're ready to serve. Also, see if you can talk Blake into making mashed potatoes to go with it.
Recipe from Simple & Delicious after the jump. My additions/changes are in brackets.
Pork Roast with Gravy, from Taste of Home: Simple & Delicious, February 2009
This home-style supper can be made [a day ahead]. Strain and skim the cooking juices, cover and store all in the fridge. Then reheat the pork to 165 degrees and finish the gravy in a pan [the next day].
1 boneless whole pork loin roast (3 to 4 lbs.)
1 can (14 1/2 oz.) chicken broth
1 cup julienned sweet red pepper
1/2 cup chopped onion
1/4 cup cider vinegar
2 Tbsp. Worcestershire sauce
1 Tbsp. brown sugar
2 tsp. Italian seasoning
1 tsp. salt
1 tsp. pepper
2 tsp. cornstarch
2 tsp. cold water
1. Cut roast in half; transfer to a 5-qt. slow cooker. In a small bowl, combine the broth, red pepper, onion, vinegar, Worcestershire sauce, brown sugar and seasonings; pour over pork. Cover and cook on low for [4-6] hours or until a meat thermometer reads 160 degrees and meat is tender.
2. Remove pork [and reserve some for another use if desired].
3. For gravy, strain cooking juices and skim fat; pour 1 cup into a small saucepan. Combine cornstarch and water until smooth; stir into cooking juices. Bring to a boil; cook and stir for 2 minutes or until thickened.
4. Slice pork; serve with [mashed] potatoes and gravy. Yield: 4 servings.
November 14, 2008
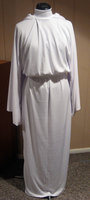
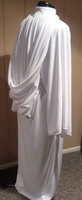
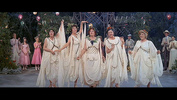
Lisa: in the best Delsarte tradition
I told you! I get to wear a ridiculously decorated faux toga. Bonus: I decorated it while watching the season finale of Mad Men with Sarah. Now, every time I put it on, I think of Don Draper. Unfortunately, every time I put the toga on, I am also reminded that my hair will never be as awesome as Joan Holloway's.
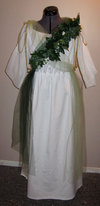
In action:
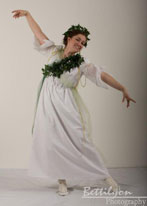
We open tonight! I hope I see you there.
October 04, 2008
Lisa: bittersweet
Today is my last day working for the library, at least for the near future. My feelings about this are so mixed, but I think excitement for the next phase of my life is winning out.
Thank you, thank you to Dawn for helping me find library science, to the University of North Texas for allowing me to earn an MLS without leaving Salt Lake (and Blake), and especially to the Salt Lake County Library System for hiring and training a brand new children's librarian (and for working around my pregnancy, delivery, and new motherhood for as long as they did). I consider this my career, and I'll be back, refocused and ready to work harder than ever in just a few years.
Thank you also to Concert Black, for making this change possible, and to my mom, whose vision, drive, and very hard work has made our little company run so well that instead of working on it "on the side," it can be my main job. I can hardly believe that I'll be writing myself a paycheck for filling those website orders from home.
Thank you most of all to my little Nora, for coming into my life so fortuitously. You have brightened it and made each day better in a way I could never have imagined. It has been hard for me to leave you every day (even with people who love you as much as Sir, Grandma, and your dad do) and I can't wait to be home with you to watch you changing and growing. I feel like I'm growing because of you, too. And of course, I'll be there to make sure you have on pants.
Phewf! Enough sappy stuff. See you all online.
August 20, 2008
Lisa: does anyone want some herbs?
I don't know if anyone remembers our herb garden project, but I thought I'd post an update since things are going so well.
Here's a view of the whole garden, the HUGE comfrey plant (What does one use comfrey for? I guess I should have researched that before planting.), mint, sage, and our little champion tomato plant. We've picked ripe tomatoes four times now, I think. Sorry, I'm blocking the sun with the camera in some of these shots.
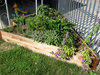


So, does this count as having a vegetable garden? I think so. Now, to find a way to use some of these goodies before they go to waste...
August 18, 2008
Lisa: This is going to be awesome.

I can see the resemblance:
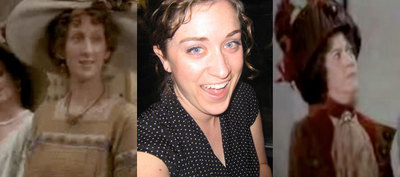
ETA: A few costumes I might have to look forward to.

April 29, 2008
Lisa: chicken & broccoli quiche
Soon after I had Nora, my awesome friend Gabrielle brought over dinner. It was SO GOOD, you guys. It was a salad with homemade dressing (in a container that I complimented so much that she got me one for my birthday), and a deep-dish quiche with broccoli and chicken. Blake loved the quiche so much that he called Gabrielle and told her so. Possibly more than once. Gabrielle thoughtfully included a handwritten copy of the quiche recipe, and I finally got around to making it last week. Why didn't I do it before? I'm kicking myself, because it is so easy and so delicious. Anyway, this is definitely going to be one of the ten recipes I memorize.
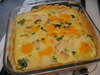
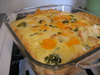
Gabrielle's recipe is after the jump. Things I added are in bold. If you want to kick the whole thing up a notch (both in taste and in difficulty), make it in the homemade crust of your choosing.
Edited to add: I only have one glass pie pan, so I made the second quiche (which wasn't eaten yet by the time I took pictures) in a square baking dish. It worked fine, but the crust--which started out round--looks a little funny. Don't you judge me.
Gabrielle's Chicken & Broccoli Quiche
Serves 6. Cooking time 35-40 minutes. Preheat oven to 375 degrees.
1 unbaked 9" pie shell (I use Pillsbury) These are in the refrigerated section near the Pillsbury crescent rolls in the tube. Get the rolled up refrigerated kind instead of the kind in the freezer section that are already in a pie tin, because then you can bake the quiche in your own dish and crimp the edge yourself so that it looks more homemade. Tricky! They come two to a package, so you might as well make two quiches at once.
2 cups fresh broccoli, cooked and drained
1 whole chicken breast, cooked and chopped Or chopped and then cooked, which is how I did it since I was in a rush. Small pieces = faster cooking, plus they don't have to look pretty because they'll be covered with delicious, delicious egg and cheese.
6-8 ounces Swiss cheese, cut into 1/4" cubes When I was buying the cheese, I forgot I was doubling the recipe, so I bought an 8-ounce brick. When I figured out my mistake back at home, I threw in 4 additional ounces of cheddar that I had on hand. The cheddar was tasty in the finished product, and I ended up with about 6 ounces of cheese per quiche. Disaster averted.
3 eggs
1 cup heavy cream I also only got enough cream for one quiche, but I added a cup of milk to make up the difference in volume (skim is what I had on hand). I didn't notice a difference, and there was a little less fat, so...whatever. Your mileage may vary.
2 tablespoons lemon juice
1 teaspoon salt
1/8 teaspoon pepper
chives (green onions) to taste
Leave the pie shells out of the fridge for 15 minutes or so before unrolling. Unroll pie shell and place in pie pan while you prepare the other ingredients. Sprinkle broccoli in bottom of the shell. Top with chicken, then cheese. In a small bowl, using a whisk, beat the eggs, cream, lemon juice, salt, and pepper until blended, but not frothy. Pour over cheese mixture; sprinkle with chives. Bake in 375-degree oven for 35-40 minutes or until knife inserted in the center comes out clean. (If you have some extra, sprinkle grated swiss over the top for the last 15 minutes of cooking.) Let stand at least ten minutes before cutting.
Since I made two quiches but only needed one, I pulled the other out of the oven at 35 minutes and stuck it in the freezer. The interwebs tell me I can warm it up in a 375-degree oven for 20 minutes. I'll let you know how that turns out.
March 20, 2008
Lisa: 29 x 29
When I was making my list of things I want to do, I started thinking about the things I've already done. I think everyone should do this--we all need a little pat on the back and a reminder that we've experienced some pretty cool things.
In the last 29 years, I have...
1. Backpacked through Europe
2. Become a regular at a restaurant
3. Bought my own house
4. Chosen a pumpkin from a pumpkin patch
5. Collected trilobite fossils
6. Cooked with fresh herbs I grew
7. Danced in the rain like a crazy person
8. Earned a Master�s degree
9. Finished a marathon
10. Found the best recipe for chocolate chip cookies
11. Given birth
12. Hung my own art in my home
13. Landed a job in a career I love
14. Laughed until I peed my pants
15. Married someone who thinks talking nonsense as I fall asleep is charming
16. Performed in front of an orchestra (four times)
17. Picked fresh raspberries
18. Printed using an old-fashioned letterpress
19. Seen the Grand Canyon
20. Shopped for honey at a Trappist monastery
21. Spent the night on a train
22. Started my own business
23. Stayed up all night reading a book
24. Stood in four states at once
25. Swam with a sea turtle
26. Touched a stalagmite
27. Tried water-skiing and snow-skiing
28. Worn something I knitted
29. Written a blog featured on Boing Boing
March 19, 2008
Lisa: 35 x 35
I'm turning 30 this year, a milestone that I think typically comes with a lot of soul-searching and maudlin whining about getting old. Time is going by faster than ever, and I was starting to get concerned about waking up one day as a sixty-year-old, having no idea how I'd gotten there and wishing I'd done more along the way. When I saw Maggie's list of 100 Things to Do Before I Go, it seemed like the perfect way to take control of the next few years of my life and accomplish some things--big and small--that I want to do for myself. Instead of 100 things to do before I die, my list is 35 things I want to do before I turn 35. I work better with a deadline.
1. Appear as an extra in a movie
2. Attend a fancy-dress ball
3. Be debt free
4. Build a tree house
5. Buy a new car with cash
6. Eat off the fancy china more than twice a year
7. Find the perfect signature scentB&B White Citrus
8. Fly first class
9. Give homemade Christmas gifts December 2009
10. Go on a photo safari in Africa
11. Help someone learn to love to read 10/29/12
12. Ice skate at Rockefeller Center 12/31/09
13. Inspire someone to become a librarian 3/20/08
14. Make Nora the Halloween costume of her choice, like my mom did10/22/11
15. Meet an honest-to-goodness celebrity
16. Memorize (and regularly use) ten main-dish recipes
17. Order room service in a five-star hotel 3/23/09
18. Own a fabulous designer bag or pair of shoes
19. Paint every room in my house a different color
20. Quit my job and work from home9/4/08
21. Rent a scooter in Greece
22. Reupholster a piece of furniture myself
23. Sew Nora�s baby clothes or Christmas pajamas into a quilt 4/12/09
24. Sign up for a pottery class December 2009
25. Sing in a musical 11/14/08
26. Spend money only on essentials for one month June 2010
27. Start a vegetable garden 8/20/08
28. Stop needing validation from other people
29. Tailor all the clothes in my closet so they fit just right
30. Take ballroom dance lessons
31. Teach Nora to knit or sew
32. Walk along the Great Wall of China 3/29/09
33. Wear a bikini on the beach without being embarrassed
34. Weave a rug on a loom
35. Write and publish a book