
June 02, 2008
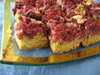
Lisa: raspberry almond blondies
I've been reading about Martha Stewart's Cookies: The Very Best Treats to Bake and to Share everywhere, especially on Angry Chicken, so I had to check it out from the library and see it myself.
All of the recipes sound amazing, but you have to start somewhere, right? I went with the raspberry almond blondies (recipe after the jump).
Fresh raspberries were a ridiculous $7 a box at the grocery store, so I bought frozen rasberries instead. I thawed and rinsed them, but I think frozen fruit still has a significantly higher water content than fresh fruit. I'm pretty sure this was the problem with my lemon blueberry yogurt bread, too. The blondies came out great, but took 30 minutes longer to cook than the recipe called for.
Martha's Raspberry Almond Blondies
makes 16
9 tablespoons (1 stick plus 1 tablespoon) unsalted butter, room temperature, plus more for pan
1 2/3 cups all-purpose flour
1 teaspoon baking powder
3/4 teaspoon coarse salt
1 cup packed light brown sugar
2 large eggs
1 teaspoon pure vanilla extract
1 cup sliced almonds (about 3 ounces), toasted (I just spread them out on a cookie sheet under the broiler and turned them with a spatula once they started getting brownish on one side.)
2 2/3 cups raspberries
1. Preheat oven to 325 degrees F. Butter an 8-inch square baking pan. Line with one longish piece of parchment paper, allowing 2 inches to hang over two sides. Butter parchment.
2. Whisk together flour, baking powder, and salt in a bowl.
3. Put butter and brown sugar in the bowl of an electric mixer fitted with the paddle attachment. Mix on medium speed until pale and fluffy, about 3 minutes. Or cream in a large bowl with a hand mixer. Add eggs and vanilla; mix until combined. Mix in 3/4 cup almonds.
4. Pour batter into prepared dish; smooth top. Scatter berries and remaining 1/4 cup almonds over batter. Bake, rotating dish halfway through, until a cake tester inserted into center comes out with moist crumbs, 55-60 minutes. If you use frozen berries, plan to add about thirty minutes to your cooking time, checking often.
5. Let blondies cool 15 minutes. Transfer blondies to a wire rack, and let cool completely. Cut into 2-inch squares. Blondies can be stored in single layers in airtight containers at room temperature up to 3 days.
June 04, 2008
Lisa: What would Freud say?
When my mom saw my new repurposed-thread-rack finger puppet display system sitting on my table, she exclaimed over the simultaneous cuteness and uselessness of finger puppets. We got to talking about them, and...I think this needs to be quoted directly.
Mom: Hee. A Freud puppet might be funny for intimate moments. [holds up one finger as a puppet, wiggling it] "Are you ready for some...therapy?"
Lisa: [condescending psychiatrist voice] "Does someone have an oral fixation?"
That's right, I took it to the next level. With my mom.
June 05, 2008
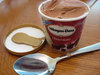
Lisa: practically zero calories
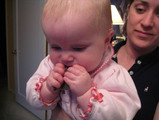
I couldn't resist these tiny 4.23-ounce Haagen-Dazs minis (with a little "spoon" inside the lid!) when I saw them on sale at Harmons for $1 each. They're the perfect size; you can eat the whole container in a satisfying way, but you get to skip the self-loathing that comes with polishing off an entire pint in a single sitting. Plus, there's the extreme cuteness factor.
Of course, I had to use a regular-size spoon for faster delivery.
June 06, 2008


June 08, 2008
Sarah: The Price is Too High
I've been working a few travel details out the past few days, so I've been online with greater frequency (hmm. My fingers just typed 'freakwency'. Yeesh.) and have been utilizing the cheap internet at a McDonald's near our hotel.
Last night a man pretended to talk to me through the glass (in Hungarian?) and, when I motioned that I could not understand, he kissed at me and then stood there for a moment after I rolled my eyes and looked at my computer screen with intense and singular focus.
Tonight Marci and I sat near the computers, waiting for one to become available. I glanced out the window at a group of men in line for an ATM, only to be confronted by one man's exposed penis, peeing against the wall.
I think I need to find a new place to check my email.
June 11, 2008
Sarah: Are You There, God? It's Me, and I'm Lost.
I am happy to let the internet know that Marci and I have an Austrian guardian angel. He carries a large camera and directs us on how to get on the right bus to meet Staci. I hope he will follow us to Rome to swat away any wandering Italian hands.
We'll be home in four days. It is craziness.
June 12, 2008
Lisa: how about I make you a nice sandwich, and we'll forget this ever happened?
I was innocently enjoying this unspeakably nerdy article on retconning in comic books when I stumbled across the words, "they like the taste of your sandwich."
I think it was lunchtime. "Mmm, sandwich," I must have thought. I made an immediate mental note to add this turn of phrase to my everyday speech. To my lexicon, if you will. I tried it out in several contexts:
1. In place of "I like the way you think"
2. In an "I find you adorable" sort of situation
3. As an "I'm picking up what you're putting down" substitute
4. As my Facebook status
I am saddened to report that I had a 0% success rate. People did not like the taste of my sandwich, if you know what I mean. I know, I know, you don't--that's the problem. It either came off as nonsensical or vaguely dirty, depending on the audience and the topic at hand. I'm afraid "I like the taste of your sandwich" will have to be retired (along with such gems as the exclamation, "that's over the COUNTER!").
Now, more importantly: ham and cheese or peanut butter?
June 18, 2008
Sarah: Catching My Breath
It's so good to be back home. To hug my friends, to chat with my family, to walk, hunched over, with my index fingers being gripped tightly by a little walking Nora. I am planning to write a little about the last six weeks I spent in Europe but am a little overwhelmed. How does one start? At the beginning? There are so many wonderful details, so many hilarious friends, so many new cities that I've fallen in love with. I want to share it with you, and I wish I could have taken you with me. Mostly, I am afraid to see how many pictures I crammed into 3GB, and I don't want to bore you. I hope to have some sort of wrap-up for you in the next few days, if you're interested. If you're not, well, you should comment and tell me what I should be writing instead.
Oh, and in case you are relieved that I finally stopped posting weekly entries about recipes that I often didn't have the culinary prowess to successfully pull off? Well, that's too bad. I actually cooked enough before leaving for Europe that I could have Lisa post an entry each week while I was gone, but then I didn't write them because I figured I should spend that time packing and catching my plane and stuff. So instead I plan to inundate you with cooking entries in the coming days or weeks.
Still there? I think you'd like this. I did.
I'm headed back to working (I was on time today, miraculous!) and apartment hunting. Thanks for bearing with me!
June 19, 2008
Lisa: I said who do you think you are
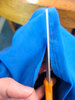
I went to the hair salon on Tuesday.
Stylist: "What's that paper? Aw! Did someone bring a picture?"
Lisa: "Um. Maybe. No making fun!"
S: "Let's see it! What do you want?"
L: (Hangs head in shame, unfolds printed-out Word document and thrusts it at the stylist.) "Pob me."
S: "Hee. All you had to say was 'Posh Spice.' Wow, you even cut and pasted these in here and everything! You're serious!"
L: (Laughs uneasily.)
I think it turned out OK, though.


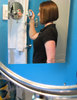

Sorry about the mirrors--it's surprisingly difficult to photograph the back of your own head.
June 20, 2008
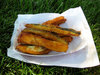
Lisa: Friday, Fries, and Frolf
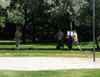
Last week, Nora and I had 45 minutes to kill before meeting my mom to shop for a Father's Day gift, so we decided to finally try the zucchini fries I've had my eye on at Woody's Drive-In.

After we got our food, we drove to Creekside Park for a picnic. Here's Nora, eating a quesadilla and trying to charm the nearby kids into coming over and making friends. It worked.

My raspberry shake was really good, and the zucchini fries were okay for a novelty food. They're strips of zucchini, battered and deep-fried--kind of like a heavier, wetter version of vegetable tempura.

There was some kind of frisbee golf tournament happening at the park; at least, I hope so. About fifty men in their twenties and early thirties--the majority of them unfortunately shirtless--were just hanging around, throwing frisbees at poles at 3:00 on a Friday afternoon. If it wasn't a tournament, I am terrified for my generation. Don't worry, though, I documented some of the half-naked frolfers for your viewing pleasure:
June 21, 2008
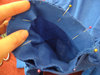
Lisa: Friends don't let friends wear men's golf shirts.
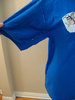
You know those golf shirts they ordered for everyone at work? Yours doesn't really fit, does it? Like, it's somehow simultaneously too big AND too small? Maybe because you are not six feet tall and shaped like a sausage? I think I can help.

First things first: find a good show on Tivo, so you don't get bored, and plop the baby in the walker. Hi, cutie!


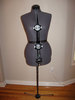
Double-check your measurements against your trusty dress form (you can even make your own if you don't want to splash out for this invaluable tool).
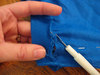
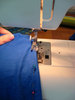
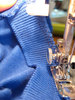
Okay. Turn your golf shirt inside out and put it back on the dress form. Your shirt probably doesn't have side seams now--we're going to create side seams in order to give it some shape. The process is the same whether it already has side seams or not, really. Just grab the fabric at the side of the shirt, under the arm, and pin it together close to the dress form, keeping the pins marching in a fairly straight line down the side. If there's a place where the shirt is already somewhat snug, like at the hips or whatever, then you only need a tiny pin tuck to keep the illusion of a side seam going. You're going to pin the body of the shirt and then continue the line of pins around the curve at the armpit and along the bottom of the sleeve. Trust me, there's enough room in that sleeve to take out an inch or so.
Unpick the ribbed material from the bottom of the sleeves. Just detatch it from the sleeve--don't unpick the stitching that keeps the cuff in a circle. Set those sad-looking things aside for now.

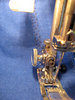
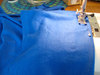
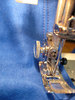
Time to start sewing! Don't bother cleaning off the table first; this is enough domesticity for one day, don't you think? Anyway, you should stitch along the line of pins you put in earlier, pulling them out as you go. After you do both side seams with a straight stitch, change your machine to a zigzag and add a row of that OUTSIDE the side seams. Trim off the extra fabric right next to the zigzag stitch. If you have a serger, this can all be done in one step (but...you are probably a very competent seamstress and don't need my help).
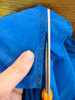
Let's address those monster sleeves. You can cut at least four inches of fabric off of each of those. This isn't an exact science; eyeball it, then fold over the fabric on top of itself as you go, using the cut-off bit as a guide so that you trim off a straight piece. Throw those pieces away, or make one into a headband a la 1990s Seventeen magazine featurettes.
Once you have the sleeves trimmed down to size, pin the cuff back on. Make sure you think this through before you start sewing! Right sides go together, and the underarm seams go together. If your shirt is still inside out, you will be pinning the cuff inside the sleeve. Then stitch a straight stich and zigzag stitch (like the side seams) right along the rough edge of the ribbing.
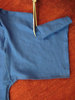
If you haven't tried your newly curvy shirt on yet, you might want to do that now to measure where the hem should be. Put the shirt on inside out, and pull the hem up over the shirt until you like the length. Pin it in four or five places so it'll stay in place while you pull the shirt back off.
The bottoms of knit shirts are usually finished with a double row of straight stitching. To copy this look, just sew around the hem twice with a straight stitch, picking a place on the presser foot to measure against for the second time around. When you're sure that you haven't hemmed your shirt too short, trim off the extra fabric.
Voila! Isn't that better? You just lost twenty pounds, visually. Work will be 45% more bearable today!

June 22, 2008
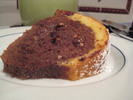
Sarah: 2008 Cooking Adventure, Week 19
I wanted to make a treat for the girls on a Tuesday night. Well, truthfully I wanted to eat cake, but luckily the girls saved me from consuming the entire cake on my own. I decided to make an Orange and Chocolate Cake from Joy the Baker (via Tastespotting).
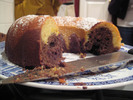
The cake is easy to put together, since it's the same mix, split in half, then flavored (orange one half, chocolate the other). The sour cream makes it delicious and moist (ew, I hate that word) and the presentation is great for only a little work.
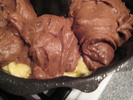
I didn't cook the cake quite long enough. I wish the cake hadn't fallen as a result, because it looked awesome when I first pulled it out of the oven.
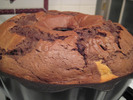
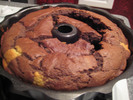
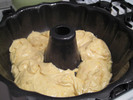
I sprinkled the top of the cake with powdered sugar, but you could also leave it plain or drizzle it with icing. Either way, I'd make this again if I needed an easy dessert. Thanks, Lisa, for letting me use your bundt cake pan!
Recipe after the jump.
Chocolate Orange Bundt Cake
adapted from the Gourmet Cookbook
3 1/2 cups cake flour
1 Tablespoon baking powder
3/4 teaspoon baking soda
1 teaspoon salt
2 sticks (1/2 pound) unsalted butter at room temperature
2 cups sugar
4 large eggs, left at room temperature for 30 minutes
2 teaspoons vanilla extract
2 cups sour cream
1/2 teaspoon orange extract
zest of 1 large orange
4 tablespoons cocoa powder
1/2 cup chocolate chips
Put rack in the oven and preheat oven to 350 degrees F. Butter and flour (I just used Pam on Lisa's nonstick pan) a 12 cup Bundt pan and set aside.
Sift together flour, baking powder, baking soda and salt and set aside.
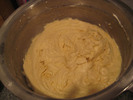
Beat together butter and sugar in a large bowl with an electric mixer at medium speed until pale and fluffy, about 3 minutes. Add eggs one at a time, beating well after each addition, then beat in vanilla. Reduce speed to low, add half of flour mixture, and mix until just blended. Add sour cream, mixing until just combined, then add remaining flour mixture and mix until smooth.
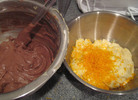
Divide the batter evenly into two bowls. In one bowl add the orange zest and orange extract and stir to combine. In the other bowl add sifted cocoa powder and chocolate chips and stir to combine.
First pour the orange batter into the buttered Bundt pan, spreading it evenly around the bottom of the pan. Next, simply add the chocolate batter on top of the orange to cover. No swirling is necessary, although you can swirl the batters together if you like.
Bake until cake is springy to the touch and a wooden pick inserted in the center comes out clean, 45 minutes to 1 hour.
Remove from oven and cool cake in the pan for 30 minutes. Invert onto a cooling rack and cool completely.
June 23, 2008
Sarah: Baby Genius
Lisa: Nora knocked over my soda, then bumped her head.
Sarah: Oh no. Everything okay again?
L: �zxddwfr���������c'/r44;r5555555555555555555rrr455=4=
L: km
S: Hi Nora!
L: liTTLE hack er
L: DE AW �W
S: ...
Lisa may not respond because she is now offline.
Lisa is now online.
L: As I was saying, friggin hacker baby hid my dock, then quit messenger. I have no idea how.
Lisa: the fall
Dave: I'm calling to give you a movie recommendation: The Fall.
Lisa: Oh yeah?
D: Yeah. And this should mean something to you if no one else--it's by the same director as The Cell.
L: The Cell? Really? With Jennifer Lopez?
D: I mean, you loved that movie, right? Even though no one else did? Except, this one, instead of being ridiculous and stupid, is the best movie of the year.
L: ...Thanks. So, what's it about?
Angie: It's everything you could ever want in a movie.
L: Everything? Is there singing and dancing?
D: Yes.
L: SERIOUSLY?
D: Well, nobody's crunking [sic] or anything. But, yes.
L: Well, it sounds like I'd better go see it!
D: Take Sarah. She'll like it too.
Anybody want to go?
June 27, 2008
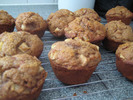
Sarah: 2008 Cooking Adventure, Week 20
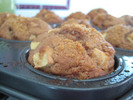
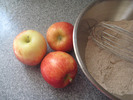
I think these Whole-Wheat Apple Muffins (from Smitten Kitchen) are perfect for Sundays. Make them for a late breakfast or a snack. They are sweet enough to feel like a treat, but the big apple chunks and whole wheat make you feel like you're being healthy. Which means you can have two, right?
This recipe convinced me that I need to sprinkle brown sugar on top of everything and put it in the oven. I am convinced that this would be delicious no matter what. I'll let you know how my new and improved tuna sandwich turns out.
Recipe after the jump. Make these. Right now.
Whole Wheat Apple Muffins
Adapted from King Arthur Flour
These dark, crazy moist muffins will keep well for several days, and the brown sugar on top, should you not skimp on it like I did, adds a crunchy touch, perfect for those of you who know that the lid is the best part.
Yield: They said 12, I got 18
1 cup (4 ounces) whole wheat flour
1 cup (4 1/4 ounces) all-purpose flour
1 teaspoon baking powder
1 teaspoon baking soda
1/4 teaspoon salt
1 tablespoon cinnamon
1/2 cup (1 stick, 4 ounces) unsalted butter, at room temperature
1/2 cup (3 1/2 ounces) granulated sugar
1/2 cup dark brown sugar, packed
1 large egg, lightly beaten
1 cup (8 ounces) buttermilk or yogurt
2 large apples, peeled, cored, and coarsely chopped
Preheat the oven to 450�F. Grease and flour an 18 cup muffin tin and set aside.
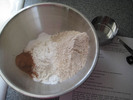
Mix together the flours, baking powder, baking soda, salt, and cinnamon, and set aside.
In a separate bowl, cream the butter and add the granulated sugar and 1/4 cup of the brown sugar. Beat until fluffy.
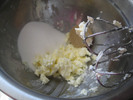
Add the egg and mix well; stop once to scrape the sides and bottom of the bowl. Mix in the buttermilk gently. (If you over-mix, the buttermilk will cause the mixture to curdle.) Stir in the dry ingredients and fold in the apple chunks.
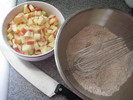
Divide the batter evenly among the prepared muffin cups, sprinkling the remaining 1/4 cup brown sugar on top.
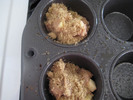
Bake for 10 minutes, turn the heat down to 400�F, and bake for an additional 5 to 10 minutes, or until a toothpick inserted into the center of a muffin comes out clean. Cool the muffins for 5 minutes in the tin, then turn them out onto a wire rack to cool completely.
June 28, 2008
Sarah: Uniform
Logowear, nametag, glasses, fannypack (with attached luggage tag!), and cell phone clipped into belt.
This software vendor is ready to work.
Sarah: 2008 Cooking Adventure, Week 21
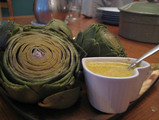
Did someone say artichokes?

Because, I think I might like those. Let me see...


Oh yes. They are, indeed, delicious.
I grew up dipping them in mayo, but if you want to look slightly more sophisticated, you could try a homemade aioli, thanks to Orangette. Yum. Just don't feed the aioli to the baby. She likes the plain artichoke just fine.
Recipe for the aioli after the jump.
Meyer Lemon Aioli
Adapted from Bon App�tit, April 2008
1 medium garlic clove
1 large egg yolk
2 tsp. Meyer lemon juice (though I just used regular lemon juice. I'm a rebel)
� tsp. champagne or white wine vinegar (I used vinegar)
Heaping � tsp. Dijon mustard (I used fancy mustard we had in the house. It wasn't as creamy as dijon, but I think the mustard seeds made it more interesting.)
� tsp. salt, or to taste
� cup extra virgin olive oil
Zest of 1 medium Meyer (regular works!) lemon, or to taste
If you have a garlic press, press the garlic clove. If you do not have a garlic press, mince the clove finely; then sprinkle it with a pinch of salt and smash it a bit with the side of your knife, so that it softens to a dense paste.
In a medium bowl, combine the garlic, egg yolk, Meyer lemon juice, vinegar, mustard, and salt. Whisk briefly, until the mixture is bright yellow and well blended, about 15 to 30 seconds.
Now, start adding the oil. It is absolutely crucial that you add it very slowly. For the first � cup, add it impossibly slowly � only a few drops at a time � and whisk constantly. Make sure that each addition of oil is fully incorporated before you add any more. (Your arm will get tired, yes, but don�t worry; you can stop to rest as often as you need to.) As the oil is incorporated, the mixture should begin to lighten in color and develop body, thickening tiny bit by tiny bit.
After you have added the first � cup oil, you can increase the speed at which you add it, pouring it in a thin, continuous stream, whisking constantly. Stop every now and then, if you need to, to put down the measuring cup, whisk well, and make sure that the oil is fully incorporated. The mixture should continue to thicken, and by the time you have added all the oil, it should be pale yellow (or yellowy-green, depending on the color of your olive oil), silky and thick. Whisk in the Meyer lemon zest. Taste, and adjust seasoning - vinegar, salt, zest - as needed.
Serve immediately, or cover and chill for up to three days.
Note: For safety�s sake, raw egg is not recommended for infants (I told you!), pregnant women, and people with weakened immune systems. To avoid the risk of salmonella, buy your eggs from a reputable source, and take care when separating the yolks and whites, so that the contents of the egg do not come in contact with the outer part of the shell. Or use pasteurized egg yolk instead.
Yield: about � cup, or enough for at least four artichoke eaters
Sarah: MeTube
Yes, we've already talked about how much we love YouTube, but I think there are a few videos you might have missed.
If you like baking, perhaps you'd be interested in learning how to make bread.
If you didn't think you were interested in knowing how slugs mate, well, you were wrong. You are interested.
And if you're wondering what I would do while my friend got molested by an Italian tourist in Prague? The answer is: I would take a video of it.
That's right, I'm on YouTube. It feels like home.