
May 01, 2008
Sarah: 2008 Cooking Adventure, Week 18
I often forget about how much I love salmon. I'm so glad that on a certain, otherwise forgettable weekday, I decided to make myself a nice, warm dinner. I'm not a great chef, but salmon is something anyone can cook without going too far astray.
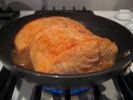
I just salt-and-peppered the fish, browned the top quickly, then let it cook, covered for most of the time, in a pan with some water and some asian salad dressing (you know, as a marinade). It was lazy, but easy.
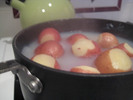
While the fish cooked, I put some red potatoes in some water (with a little salt and milk) and let them cook until soft.
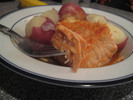
And then dinner was done. It was not terribly exciting, but I recommend salmon and potatoes (or rice, or salad) for dinner tonight. Leftovers can be eaten hot or cold, served just like dinner or over a bed of lettuce. Yum.
May 02, 2008
Sarah: (Someone Else's) Handwritten Friday
I loved this little video (via A Little Hut).
What is your favorite letter?
May 05, 2008
Lisa: headboard
The other day, I started vaguely considering a minor bedroom-revamping, and I priced some upholstered headboards online. That morphed into looking for instructions on making your own upholstered headboard, and then suddenly all the raw materials were at my house, waiting for me to do something with them. Funny how that happens.
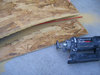
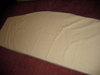
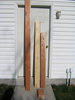
Anyway, one day while Nora was down for a nap, I brought the baby monitor outside, dragged the chipboard and foam out of the garage, and got started.
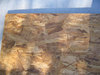
I got the foam pieced together and glued by the time she woke up. I hadn't really thought about how I was going to glue the foam together, but I remembered from Cockeyed that contact cement might work. I wasn't sure what contact cement was, and I knew I didn't have any, so I googled it. Hmmm. That container looks kind of like blue glue, doesn't it? I dug the blue glue out of Blake's bag of sprinkler stuff and used that--it's stinky, but it worked fine. It didn't take much to get the edges to stick to each other.
For the headboard's arch, I traced a template I had found online, printed out, and taped together. After I had the shape marked, I used Marci's RotoZip saw to cut it out. This is the perfect tool for this kind of application. The RotoZip is basically a drill, but with a little guard added around the drill bit, and an extra handle on the side for stability. you put the guard right up against whatever you're sawing, and then move the drill wherever you want, making a freehand cut. So, it's not intimidating to use for anyone who has used a drill before. It doesn't make a perfectly smooth or straight cut (especially in a material of varying content, like chipboard), but that's OK when you're planning on covering your cut with thick layers of foam and fabric, and you just need the right overall shape. Thanks, Marci!
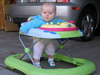
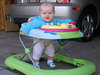
Meanwhile, Nora was being a superchamp, yelling back at the saw and thinking we were playing an awesome new game.
Once I had the wood cut out, I wrestled it on top of the foam and traced it with a sharpie. I used my trusty electric kitchen knife to cut the foam. That's what the instructions said to use, and when the lady at JoAnn's used an electric knife to cut the length I needed, I figured it was the way to go.
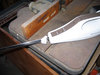
Nora thought the knife was almost as fun as the saw.

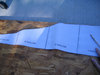
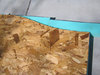
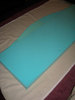
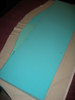
After I brought Nora inside and got her set up with some toys, I laid out my fabric, right side down, and lugged the wood and foam inside and centered the foam on the fabric. I trimmed the extra fabric a bit.
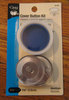
I got some big covered button kits (the only kind sold at JoAnn's) and made some buttons with the scraps I had trimmed off. I pinned the fabric loosely to the back of the foam, flipped it over, and figured out where I wanted to place the buttons. Then I sewed the buttons through the fabric and foam, and through another button on the back side to keep the thread from pulling through the foam. Here's the thing. In my experience, tufting with buttons is harder than you think it should be. For one thing, if you're using a covered button, the loop that your thread has to go through is on the back of the button. If your button is pulled into the foam really deeply, how do you get your needle back through that loop for another pass? It doesn't seem like one thickness of thread would be strong enough to keep the button tight against all that foam, either. And the first time you're pushing the needle through, it's tricky (and hurts your fingers) to push the needle in as far as you can while simultaneously compressing the foam to get the needle to poke through the other side far enough so that you can grab the tip and pull it out. I am convinced that the pros have a different set of tools to use when they're doing deep tufting--possibly including a very large needle, very strong thread, and some kind of button system with an open-faced (?) button on each side of the foam, which is easy to pull tight and allows for a decorative covered button to be snapped on afterward. Anyway, my buttons aren't as deep as I'd like, but they look OK.
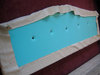
Once I had the buttons sewn in, I unpinned the fabric from the back of the foam, laid the chipboard down on top of the foam, and stretched the fabric as tightly as I could around the back of the board, stapling as I went. In a few places I had to pull the staples out, smooth things out a bit, and staple again, but it worked pretty well. I'm really glad I believed the part of the instructions that says to glue the board to the foam ONE INCH BELOW the top of the foam, even though they are cut to the same size. This allows the top of the foam to curve back around the board, making a nice round edge at the top of the headboard, instead of a slope ending with the hard edge of the board. With the headboard being so big and heavy, it was hard to get the fabric pulled tightly enough while keeping things smooth. Maybe enlist a strong person to help.
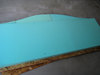
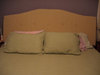
Speaking of strong people, I got Blake to help me prop up the headboard above our bed so that I could take this extremely anticlimactic picture of the final product. I don't know what's going on with the focus and the lighting and the colors here, but I'll post some prettier pictures when the whole revamping is done.
foam: $40
fabric: $18
button kits: $10
chipboard: $8
Everything else I already had or made Sarah dig out of her storage unit.
Total: $86
If I were going to do this over again, I'd use a lighter but still rigid material (MDF?) instead of the chipboard and a slightly thinner foam covered with a thin layer of quilt batting to soften the edges of the foam. I think I'd also cut the foam a bit larger than the backing, so that it would wrap around the edges more. I'd definitely try to figure out some way to get the buttons sewn in more deeply. All in all, though, I'm happy with it--and it was certainly cheaper than buying one readymade.
May 08, 2008
Lisa: Strawberry 100%
From the back of a book I checked in this morning:
EXT. ROOFTOP OF A SCHOOL BUILDING
SUNSET
The hero (me, Junpei Manaka!) sneaks up to the roof to see the sunset. When he opens the door, he startles a mysterious beauty. She panics and runs away, but not before Junpei has caught sight of her adorable strawberry print panties...in EXTREME close-up. With that vision forever burned into his memory, Junpei embarks on a quest to find the girl, and the panties, of his dreams!
FADE OUT
Oh, Junpei. We've all been there. May your quest for the perfect strawberry print panties be fruitful.
May 12, 2008
Lisa: herb garden
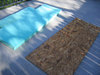
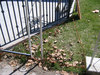
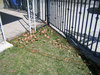
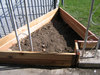
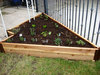
It took us at least three Saturdays, but Blake and I finally finished the herb garden we started a month ago (and have been planning since January). It turned into a much bigger project than we anticipated, but I'm really happy with how it turned out. The idea was that the garden would fill the triangular space created by the edge of our patio meeting the angle of the driveway. It's an awkward space to mow, and I thought a raised garden bed would solve that problem AND look nice there.
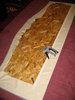
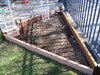
First, I mapped the whole thing out on paper and took all the measurements. Then I marked off where the garden would go, using a makeshift system of skewers and the ugliest yarn I own, Mr. Brown. We were out of string. You can see in these pictures that there are a few weird features in this corner of the yard, including two different types of wrought iron (the fence and the posts holding up the awning over the patio), two different types of cement bases for the posts, and some little braces connecting the fence to one of the posts--I assume to give stability to the fence. I was hoping the garden would sort of camouflage some of these idiosyncracies.
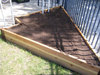
Blake cut the sod out of my marked area...
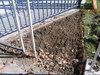
...and we picked up some redwood decking at Home Depot for the sides of the raised bed. The guys at the Depot cut it to the lengths I had measured and everything. Blake had to do a little extra cutting to make a hole for one of the wrought iron braces to go through, but that's it.
The corner brackets are made by a company called Frame It All, and I found them at a garden store in Bountiful called J&L Garden Center. The brackets are great, because they allowed us to build something that was much more complex and nice-looking than our carpentry skills would have allowed otherwise. You can use them with any 2x6 wood, too, not just the plastic stuff sold by Frame It All. A few caveats, though:
1) The included instructions only work if you're putting your garden (or sandbox, or whatever) out in the middle of an open lawn. Otherwise, you'll need to figure out the installation on your own.
2) There are two types of brackets--Anchor Joints and Stacking Joints. I think you'd only need the Anchor Joints if you have really loose, sandy soil. If you have rocky clay, like we do, give yourself a break and use the Stacking Joints for both levels. Trust me, that six-inch stake will be stable enough.
3) The copy on the box says that the joints adjust to any angle. This is not exactly true. There is a minimum angle, which is why they recommend using at least a four-foot timber between each joint. Our first layout had a very narrow angle at the top of the triangle, which was too small for the Frame It All brackets. We changed the layout a bit, picked up a few more brackets to accomodate the jog around the post anchor (and a few more boards), and ended up with a shape that I think I like better anyway.
After we cut out another strip of sod, we laid out the boards and anchors where they would ultimately go, to make sure everything would work. Luckily, I had measured things right!
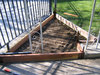
Blake and Sarah helped dig the holes for the stakes, and we got the boards and joints all in place and screwed together.
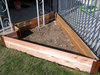
We took three trips to the garden store for bags of dirt, because we completely underestimated the amount of dirt it would take to fill up the garden. I think it was ten bags of compost and potting soil all together.
After the fresh, smooth dirt was in, it was quick work to plant the herbs and things we had bought. There's parsley, two kinds of sage, rosemary, thyme, two types of oregano, comfrey, two different mints, and I think a few others, plus several sweet williams (a Mother's Day gift from my mom) and a couple of the strawberry plants we got from the Turnbulls.
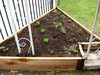
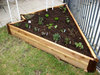
We left a little space to plant something that will climb up the post that is inside the bed. Now, if we can just manage to keep everything alive and looking nice! One of the lawn sprinklers is inside the new bed (Blake added some pipe to make it taller), so at least our efforts shouldn't be foiled by a lack of watering.
May 13, 2008
Sarah: Checking In
I don't have long, so some quick lists:
Cities I've seen so far:
Edinburgh
Fort Augustus
London
Oxford
many others I will tell you about later
Foods I have tried that I swore I wouldn't:
Haggis. Not as terrible as you'd expect, actually.
Admirerers that Marci has not made out with (as far as I know):
Ash, from New Zealand
Damian, from Poland
We've enjoyed trains, tubes, buses, and lots and lots of walking in the eight days. Marci has written much more details on her blog, and I'm still working on pictures. They may have to wait until the end of the trip. For now, I'm off to work some more on my raging farmer's tan and hopefully get some shopping done. I haven't spent too frivolously, yet. For shame!
p.s. Other items of interest:
Staci's boyfriend's brother is the most adorable tour guide one could home for.
We were at the Sex and the City London premiere. So be jealous, if that's your sort of thing.
We have not eaten at McDonald's, Burger King, Pizza Hut, or any other places we might be ashamed to admit. Hurrah!
May 14, 2008
Lisa: quirky
Jessica of How About Orange posted six of her "unremarkable quirks", and I felt inspired to do the same.
1. The sound of a spoon clonking around the inside of a glass blender jar is one of the nicest sounds I have ever heard. It's at least 30% of the reason I make blended frozen drinks.
2. I really like stalking. And spying. And covertly collecting information on people of interest. Not in a creepy way, of course. But, you? Yeah, you with the hair? I have Googled you.
3. Figure skating (singles, pairs, ice dancing, whatever--give me a spangly costume featuring illusion netting and someone swooping around effortlessly balanced on two tiny blades, and I'm sold) is the only sport I really enjoy watching on TV. Are there community ed skating classes for old people? Do you want to sign up with me?
4. Serial killers fascinate me. If I start looking things up in the Crime Library, I get sucked in for hours. I don't let myself read much true crime, because I'm afraid it would become a habit--and there are probably more uplifting (and better written) things I could fill my mind with. Maybe four years old was too young to start listening to Sweeney Todd...no, I jest, you can never be too young for Sweeney Todd.
5. I love typing, and when I get going, I can type almost as fast as I can talk. It's like talking with my fingers, and for some reason that's a little thrilling. Maybe in another life I'll get a job as a court stenographer--but I'd want to do the voices when I read back the transcripts, and I'm pretty sure that's frowned upon.
6. I have written and published on the internet a three-chapter piece of fan-fiction. It may or may not be romantic in nature and was recognized as a featured story on the site. I am simultaneously proud and ashamed. Try to find it at your own risk.
May 15, 2008
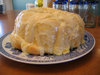
Lisa: lemon blueberry yogurt bread
This bread tasted great and looked pretty good considering what a hard time it had coming into the world. The recipe (from Ina Garten via Smitten Kitchen, after the jump) calls for a cup of yogurt that makes the bread super moist. Knowing this, I didn't worry when--after cooking for 50 minutes--the knife I used to test the center of the nicely browned loaf came out clean, but wettish. I soaked the bread with lemon juice glaze, let it cool in the pan for ten minutes, then turned it out onto a cooling rack. Immediately, the uncooked, heavy, wet center of the bread broke through the top crust and started dripping out onto the counter. I quickly slipped the pan back down over the bread, held the rack to the pan and flipped the bread back in, and popped the whole mess back in the oven for another TWENTY MINUTES. The edges got quite brown, but the center seemed to have firmed up. After the bread was cool and I sliced it up, it looked pretty good--I only ended up throwing out two slices from the very middle, where the crater at the top was most visible.
Anyway, I probably wouldn't make this again, at least not without keeping a very close eye on the baking time and temperature. If you're trying this recipe, I might suggest a lower temperature for a longer time. Other changes: I used a little more lemon zest than called for, and regular frozen blueberries instead of miniature wild blueberries (because, seriously?).
Smitten Kitchen's Lemon-Blueberry Yogurt Loaf
Adapted from Ina Garten
1 1/2 cups + 1 tablespoon all-purpose flour (if you�re skipping the fruit, you can also skip the last tablespoon of flour)
2 teaspoons baking powder
1/2 teaspoon kosher salt
1 cup plain whole-milk yogurt
1 cup plus 1 tablespoon sugar
3 extra-large eggs
2 teaspoons grated lemon zest (approximately 2 lemons)
1/2 teaspoon pure vanilla extract
1/2 cup vegetable oil
1 1/2 cups blueberries, fresh or frozen, thawed and rinsed (miniature wild blueberries are great for this, and pose the least risk of sinking)
1/3 cup freshly squeezed lemon juice
Preheat the oven to 350 degrees F. Grease an 8 1/2 by 4 1/4 by 2 1/2-inch loaf pan. Line the bottom with parchment paper. Grease and flour the pan.
Sift together 1 1/2 cups flour, baking powder, and salt into 1 bowl. In another bowl, whisk together the yogurt, 1 cup sugar, the eggs, lemon zest, vanilla and oil. Slowly whisk the dry ingredients into the wet ingredients. Mix the blueberries with the remaining tablespoon of flour, and fold them very gently into the batter. Pour the batter into the prepared pan and bake for about 50 (+) minutes, or until a cake tester placed in the center of the loaf comes out clean.
Meanwhile, cook the 1/3 cup lemon juice and remaining 1 tablespoon sugar in a small pan until the sugar dissolves and the mixture is clear. Set aside.
When the cake is done, allow it to cool in the pan for 10 minutes before flipping out onto a cooling rack. Carefully place on a baking rack over a sheet pan. While the cake is still warm, pour the lemon-sugar mixture over the cake and allow it to soak in (a pastry brush works great for this, as does using a toothpick to make tiny holes that draw the syrup in better). Cool.
May 16, 2008
Lisa: Hand-drawn Friday
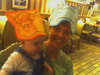
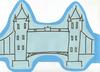
We had our Bon Voyage party for Sarah and Marci at the Crown, and I felt the occasion called for a little festive headwear. I did an image search for some of the famous landmarks they'll be seeing in Europe, and drew simplified versions onto colored paper. Voila! Crowns at the Crown. It's not the first time, but it might be one of the best.


Canal houses in Amsterdam

Parliament building in Budapest

London's Tower Bridge
Tyn Church in Prague

Roman Coliseum

Hairy Coo from Scotland
I miss you guys!
May 17, 2008
Sarah: London Calling
Neighborhoods or Sights:
Piccadilly Circus
Notting Hill
Covent Garden
The Tower of London
Musicals:
Les Miserables
Wicked
Artists:
Picasso
Kapoor
Monk
Rothko
Pollack
many, many others
Deepening Friendships:
I found out last night that Marci hates Ice-T even more than Horatio Cane. [Lisa, I'm leaving this up to you to find some awesomely hilarious links for these two "actors." Thank you in advance.] Yes, my mind was blown as well. And yes, they show Law and Order and CSI in the UK. It's like crack.
I wish I had more time to write better responses to the adorable emails I've been getting. I apologize if I've been slacking, but I hope to spend a ridiculous amount of time on the internet, my phone, and face to face (FACE TIME!) with you guys when I return.
I must be off, for there are still a few things in London that I haven't purchased. Namely, the entire inventory of Harrods.
May 18, 2008
Lisa: apple tart
In an effort to use up a bunch of overpriced apples I had purchased for a library program, I found myself searching Tastespotting for good-looking apple recipes. Somehow I still ended up at Smitten Kitchen, with the Simplest Apple Tart.
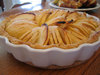

The tart turned out gorgeous AND delicious. The only trouble I had was with the dough--there just didn't seem to be enough of it. I rolled it so thin that it kept tearing, but it still barely made it to the edges of the dish. There wasn't enough dough to wrap up over the tops of the apples, and it certainly wouldn't have worked galette-style. Or maybe my dish was too big, and I had too many apples. I don't know.
Recipe after the jump.
Alice Waters�s Apple Tart
INGREDIENTS:
For dough:
1 cup unbleached all-purpose flour
1/2 teaspoon sugar
1/8 teaspoon salt
6 tablespoons (3/4 stick) unsalted butter, just softened, cut in 1/2-inch pieces
3 1/2 tablespoons chilled water
For filling:
2 pounds apples (Golden Delicious or another tart, firm variety), peeled, cored (save peels and cores), and sliced
2 tablespoons unsalted butter, melted
5 tablespoons sugar
For glaze: 1/2 cup sugar
MIX flour, sugar, and salt in a large bowl; add 2 tablespoons of the butter. Blend in a mixer until dough resembles coarse cornmeal. Add remaining butter; mix until biggest pieces look like large peas.
DRIBBLE in water, stir, then dribble in more, until dough just holds together. Toss with hands, letting it fall through fingers, until it�s ropy with some dry patches. If dry patches predominate, add another tablespoon water. Keep tossing until you can roll dough into a ball. Flatten into a 4-inch-thick disk; refrigerate. After at least 30 minutes, remove; let soften so it�s malleable but still cold. Smooth cracks at edges. On a lightly floured surface, roll into a 14-inch circle about 1/8 inch thick. Dust excess flour from both sides with a dry pastry brush.
PLACE dough in a lightly greased 9-inch round tart pan, or simply on a parchment-lined baking sheet if you wish to go free-form, or galette-style with it. Heat oven to 400�F. (If you have a pizza stone, place it in the center of the rack.)
OVERLAP apples on dough in a ring 2 inches from edge if going galette-style, or up to the sides if using the tart pan. Continue inward until you reach the center. Fold any dough hanging over pan back onto itself; crimp edges at 1-inch intervals.
BRUSH melted butter over apples and onto dough edge. Sprinkle 2 tablespoons sugar over dough edge and the other 3 tablespoons over apples.
BAKE in center of oven until apples are soft, with browned edges, and crust has caramelized to a dark golden brown (about 45 minutes), making sure to rotate tart every 15 minutes.
MAKE glaze: Put reserved peels and cores in a large saucepan, along with sugar. Pour in just enough water to cover; simmer for 25 minutes. Strain syrup through cheesecloth.
REMOVE tart from oven, and slide off parchment onto cooling rack. Let cool at least 15 minutes.
BRUSH glaze over tart, slice, and serve.
May 19, 2008
Lisa: I can't drink that
Sarah and I were loitering in the drink aisle of the grocery store, trying to find the perfect flavored lemonade, when we spied some very appealing packaging.
It was a small, dark blue glass bottle, with little bumps on the sides and a silver screw-top. "I'd buy this one just because the bottle is so pretty," one of us said, turning the drink around so we could read the name.
"Oh. Never mind."

I think the marketing person who chose the name Bawls and the marketing person who designed the bottle are two separate individuals--and the person designing the bottle knew he had to do some of his very best work to overcome that name. A noble effort, too--it was almost successful. Unfortunately, the problem is compounded because Bawls Guarana Exxtra (now with more energy, perhaps?) comes in a white version of the same bottle. If you want the original, you have to request the "blue Bawls."
Thank you, but...no.
May 20, 2008
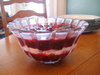
Lisa: Ruby Red Layered Jello Salad
When I was assigned a side dish for our last Freaks and Geeks potluck (American-themed in homage to Sarah's impending departure), I knew I had to make jello salad. What's more American than jello salad?
This salad sounded perfectly gross-yet-delicious. An inch-thick layer of pure sour cream? It cuts the sweetness of the fruit jello perfectly. A whole can of cranberry sauce in the top layer? What is jello anyway, if not jellied fruit sauce? Spoon it up. Best of all, it's pretty and translucent and unnaturally red, as jello salad should be. (Recipe from Ping on GroupRecipes, after the jump.)
Ingredients
1 (3 ounce) package raspberry flavored gelatin mix
2 cups boiling water
1 (10 ounce) package frozen raspberries
1 pint sour cream
1 (3 ounce) package cherry flavored gelatin
1 (8 ounce) can crushed pineapple, drained
1 (16 ounce) can whole cranberry sauce
Directions
1) Dissolve raspberry gelatin in 1 cup hot water. Add frozen raspberries, and stir until well mixed. Pour into a glass bowl. Refrigerate until almost firm, about 30 to 60 minutes.
2) Spread sour cream over firm gelatin. Refrigerate.
3) Dissolve cherry gelatin in 1 cup hot water. Stir in crushed pineapple and cranberry sauce. Chill until partially set, about 20 to 40 minutes.
4) Spoon cherry gelatin mixture over sour cream layer. Chill until firm, another hour or two.
Note: This salad is most attractive when made in a crystal bowl so the various layers can be seen.
May 21, 2008
Lisa: and the path leads...to puke
Yesterday I was tooling around online, looking for retro jello recipes to link, and I found a posting from someone looking for recipes for their fifties-themed bridal shower. "Ooh! A fifties-themed shower," I thought to myself. "Fun! I love fifties things!" That made me think of Avocado Memories, and I spent a while there, remembering the awesomeness of Wes's family home and getting caught up on stuff he had posted in the last few years. One of his recent additions was a tribute to the Spirograph, a toy I also had as a kid--and that, in my mind, will forever be associated with puke.
Once upon a time, when I was still little enough to ride in the basket of the shopping cart, my dad was pushing me around the store while he got some shopping done. I started feeling queasy, but before I could get Dad's attention, I threw up. I held my mouth closed as tightly as I could so I wouldn't make a mess, tugged on his sleeve, and pointed frantically at my mouth. Dad, thinking I was playing some wacky little-kid game, puffed out his cheeks and pointed at his own mouth, nodding his head. Unfortunately, at that moment, another heave hit me, and it was more than I could hold in. Puke sprayed out of my mouth, and probably all over me and whatever else was in the cart. I've blocked that part of the story out, because it is disgusting. What I do remember is that my dad felt so bad that he bought me Spirograph, which I played with happily all afternoon in bed.
He also made me a puke-catching system out of nested paper grocery bags, which my mom promptly threw out and replaced with a proper barf-bucket when she got home.
Anyway, thanks for taking care of me, Dad! Sorry about the mess.
May 22, 2008
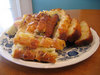
Lisa: orange rolls
I thought orange rolls would go nicely with our American potluck, and boy, was I right. The jello was fun and everything, but this pull-apart concoction was so amazingly, evilly good. It may become a Christmas morning tradition at our house.
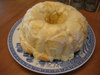

It's easy, too--and if you don't have four hours to let the rolls rise, you can follow the quick-rise directions on the roll package. Recipe (from add to desired taste) after the jump. Reader beware: only make this if you have a lot of people to share it with, or if you want to gain approximately ten thousand pounds. Because you will eat the entire thing.
Easy Orange Rolls
1 package frozen rolls (Rhodes)
1/4 cup melted butter
5 Tablespoons sugar
2 Tablespoons orange peel
Preheat oven to 350. Mix butter, sugar and orange peel in large bowl. Add FROZEN rolls, stir to coat. Spray bundt pan with nonstick spray. Pour rolls into bundt pan, making sure all of sugar mixture is on rolls. Cover with towel and let defrost/rise, about 4 hours. Bake for about 15-20 minutes, until golden brown. Turn out onto serving plate immediately and pour frosting over top.
Frosting:
1/4 cup butter
2 cups powdered sugar
1 Tablespoon orange juice
1 Tablespoon orange peel
Mix with mixer until smooth.
May 23, 2008
Lisa: no more nougat
Ants ate my Toblerone. This is the universe telling me that I am too fat to be eating a Toblerone.
On the other hand, I won the Toblerone in a drawing at work. I never win things. So, that could be the universe saying, "Go ahead. Eat a Toblerone. You've earned it!"
STOP MESSING WITH MY MIND, UNIVERSE! I am feeling very fragile right now. Yes. What? Yes! Because ANTS. ATE. MY FRIGGIN TOBLERONE.
May 24, 2008
Lisa: sour cream chocolate chip coffee cake
For our Mother's Day dessert, I made chocolate-chip sour cream cake (recipe from the Boston Globe, after the jump). It was tasty with the chocolate chips, but I think it would be really good without, also--as a regular coffee cake, or with raspberries or something swirled in.

Yum! We had ours with a scoop of vanilla ice cream on top.
CHOCOLATE CHIP SOUR CREAM CAKE
Makes one 9-by-13-inch cake
1 stick of butter, at room temperature
2 cups sugar
3 eggs, separated
16 ounces sour cream
1 1/2 teaspoons vanilla extract
3 cups all-purpose flour
1 1/2 teaspoons baking soda
1 teaspoon baking powder
1/2 teaspoon salt
1 teaspoon cinnamon
12 ounces chocolate chips
1. Have ready a greased 9-by-13-inch rectangular baking pan. Set the oven at 350 degrees.
2. In a large bowl, cream butter and 1 1/2 cups sugar, then mix in the egg yolks, sour cream, and vanilla.
3. In a medium bowl, sift together the flour, baking soda, baking powder, and salt. Stir into the butter mixture.
4. Beat the egg whites until they hold stiff peaks, then fold into the batter. In a small bowl, mix the cinnamon with the remaining 1/2 cup of sugar and the chocolate chips.
5. Pour half of the cake batter into the pan. Sprinkle the top with half of the cinnamon-sugar mixture. Pour remaining batter on top, then cover that with the remaining cinnamon-sugar mixture.
6. Bake 40-50 minutes or until a tester comes out clean.
Adapted from Deb Perelman
May 25, 2008
Sarah: Amsterdam you!
Lest you think I'm spending all of my time smoking doobies in the red-light district while in Amsterdam, I thought I'd check in to update. Yesterday was one of my favorite days thusfar. Sixteen of us from our class rode bikes out of Amsterdam and through the smaller towns that border the jetties. The weather was beautiful with the sun shining (oops, I forgot sunscreen!) and a breeze blowing. I fell in love with Holland. I'm a fool for a country that not only has such beautiful scenery, but an affection for wooden shoes. By the time we returned to the hotel, we'd ridden about 18 miles and had the sore butts to prove it.
Last night Feist was in town, but her show was sold out. I was seriously bummed until I discovered (just now! Just this second!) that she's performing in Park City, Utah on July 17th. Dear friends, I am freaking out. I didn't see where I could purchase tickets online. If someone would buy a ticket for me (and themself! Let's all go!), I would love that person forever. And pay them back as soon as I get back into town. Or, you know, it could be a birthday gift.
Before my trip to Europe, I did not have:
A farmer tan highlighting the outline of a shoe strap, watch band, and short sleeve shirt.
A shirt featuring a female-afro-sillouette. Which everyone should own. And which three of us do own.
A wacky pillow cover.
A well worn map of Amsterdam.
A constant, nagging need for poffertjes.
Besides imagining what shenanigans my dad probably fears I am getting in to, I am thinking about:
Yesterday was my little brother Jeff's birthday. He's in New Jersey, no doubt charming the crap out of people like he charms the crap out of me. I chatted with some new friends about Jeff the other day, and about how he attended such an amazing university after high school. I'm so proud of Jeff, for his incredible kindness, his cheerful friendliness, his superior intellect and how quick he is to love and forgive. Jeff, I wish I could grow up to be as great as you.
May 26, 2008
Lisa: this should cover it
Sometimes you just have to use your camera phone to take a picture of the car in front of you.

In case it's hard to read the individual 2-inch letter stickers adhered to the back of this mini-van, they spell "A SIGN OF DISTRESS/NOT OF DISRESPECT." This confused me for a few blocks, until I saw the white sticker in the lower left corner of his rear window. You can't tell in the photo, but the sticker has a drawing of an American flag flying upside down, along with the same slogan. I'm not going to get into a discussion of proper flag etiquette, but this gentleman's message inspired a blanket-statement bumper sticker of my own:

May 29, 2008
Sarah: Che-che-che-che Czech it Out!
Not much time, but:
Got to Prague yesterday. So far:
1. Dutch boys are officially cuter than Czech boys. Bummer.
2. I climbed 287 steps up the tower of a cathedral. Then my new friend Kaeleigh threw an 8 year old boy out of the window.
3. While on this same stairway, an overweight man in his 50s scooted up the stairs until his belly cradled my bottom. Un. Comfortable.
4. Walked down the Golden Road. Did not see any gold. Prague, how dare you lie to me.
5. Marci and I have two twin beds that the hotel staff has pushed together. She rejected my offer to spoon last night.