
May 15, 2009
Lisa: Etch a Sketch
Inspired by this glass-etching tutorial on isly (found via this post on How About Orange), I decided to try etching a giant monogram (I love monograms) into my 9x13" pyrex baking dish, in an effort to make it prettier and more identifiable at potlucks.
All the background info and steps are after a jump, but here's the finished product:
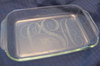
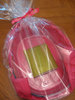
I liked my finished baking dish so much (and making it was so fun and easy) that I made another one for my cousin as a wedding gift, this time with just the first initial of her new last name.
I admit, I felt a little less cool when I went to church the next Sunday and found out that etching glass baking dishes is our upcoming Enrichment Night craft. But at least mine isn't made with one of those precut vinyl dealies, right? It's still a LITTLE bit original. So. Want me to make one for you?
Materials:
Computer
Printer
Monogram font
Adobe Illustrator (or whatever program you like)
Scotch tape
Transfer paper
Contact paper (any pattern)
Pen/pencil/stylus
X-Acto knife (sharp)
Spatula
Armour Etch
Pyrex baking dish
Kitchen sink
Silicone baking spatula
Note:
The bottle of Armour Etch says it won't etch Pyrex, so I did a little checking around on the internet. I'm glad I did, because I learned two important things that were backed up by several sources. First of all, you CAN etch Pyrex (at least some Pyrex) with Armour; you just have to leave it on for 25 minutes instead of five minutes. Also, you don't have to just wash the etching cream down the sink when your time is up, like it says on the packaging--you can scrape it right back into the bottle and use it again! A little bit is still lost, but you'll get a lot more use out of that expensive bottle.
Steps:
1) I downloaded monogram kk from Abstract Fonts, and tooled around with my initials for a few minutes in Illustrator. I was hoping the large size of the monogram would make it feel more modern, and that at first glance it would just appear be a pretty, scrolly design. Once you've decided on your design, reverse it before printing. You'll be etching on the bottom side of the dish (so little bits of food don't get stuck in there), and you want to be able to read the letters through the bottom of the dish when it's right side up.
2) Cover the bottom of your baking dish with whatever leftover contact paper you have on hand (keep the color of your contact paper in mind when you're buying transfer paper). Use your fingers or the back of a spoon to smooth out any bubbles. Be especially careful around the logo/raised lettering on the bottom of the pan. It's REALLY important to make a good, smooth seal.
3) Tape your reversed, printed out design on top of the transfer paper, which is on top of the contact paper. Trace over all the edges of your design with a pen. Remove the transfer paper and printout from the contact paper carefully, making sure your entire design got transferred.
4) Use the X-Acto knife to cut out all the pieces of your design that you want to be etched. Don't stress out about this part. I hate cutting with an X-Acto knife on paper and cardboard, because the knife always goes zinging out of control at the worst possible moment and ruins my design, but it's really super easy to cut contact paper on top of glass.
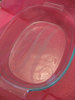
5) Brush on the Armour Etch in a very thick layer (enough so it's opaque and white), making sure you cover all the parts of your design. Don't let any sneak off the edges of your contact paper outside the design area. Also, be REALLY careful not to get any etching cream on your hands, because that stuff burns like a mother. Set your pan (carefully!) aside and time it for 25 minutes.
6) Once time is up, take your pan into the kitchen and very carefully scrape off the etching cream with a silicone spatula. Scrape it into a funnel and then back into the jar, or just right into the jar if you're coordinated enough. Then peel off the contact paper and throw it away without gooing yourself with the creamy side. You might need your X-Aacto knife to catch the tiny bits of contact paper--you don't want to be scraping them up with your fingernail and get Armour Etch under there. Then rinse off the rest of the etching cream on the pan with water. Wash your hands and arms really, really well with soap and water, and wash the pan again really thoroughly before cooking in it.
Posted by lisa at May 15, 2009 10:59 AMI love this project. Can I shamelessly copy you?
Posted by: sarah on May 15, 2009 11:03 AMYes, please!
Posted by: lisa on May 15, 2009 11:09 AMI have never noticed before that your initials almost spell your first name. That is pretty cool! Love the dish.
Posted by: Gabrielle on May 15, 2009 11:41 AMI want one!!!!
Posted by: Maureen on May 15, 2009 03:01 PMYour etched dish looks beautiful! I think it's MUCH cooler than using vinyl decals, you can make it so original.
P.S. Thanks for the link love!!
Posted by: Melissa @ IS�LY on May 15, 2009 06:41 PM