
May 05, 2008
Lisa: headboard
The other day, I started vaguely considering a minor bedroom-revamping, and I priced some upholstered headboards online. That morphed into looking for instructions on making your own upholstered headboard, and then suddenly all the raw materials were at my house, waiting for me to do something with them. Funny how that happens.
Anyway, one day while Nora was down for a nap, I brought the baby monitor outside, dragged the chipboard and foam out of the garage, and got started.
I got the foam pieced together and glued by the time she woke up. I hadn't really thought about how I was going to glue the foam together, but I remembered from Cockeyed that contact cement might work. I wasn't sure what contact cement was, and I knew I didn't have any, so I googled it. Hmmm. That container looks kind of like blue glue, doesn't it? I dug the blue glue out of Blake's bag of sprinkler stuff and used that--it's stinky, but it worked fine. It didn't take much to get the edges to stick to each other.
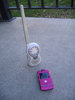
For the headboard's arch, I traced a template I had found online, printed out, and taped together. After I had the shape marked, I used Marci's RotoZip saw to cut it out. This is the perfect tool for this kind of application. The RotoZip is basically a drill, but with a little guard added around the drill bit, and an extra handle on the side for stability. you put the guard right up against whatever you're sawing, and then move the drill wherever you want, making a freehand cut. So, it's not intimidating to use for anyone who has used a drill before. It doesn't make a perfectly smooth or straight cut (especially in a material of varying content, like chipboard), but that's OK when you're planning on covering your cut with thick layers of foam and fabric, and you just need the right overall shape. Thanks, Marci!
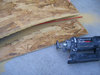
Meanwhile, Nora was being a superchamp, yelling back at the saw and thinking we were playing an awesome new game.

Once I had the wood cut out, I wrestled it on top of the foam and traced it with a sharpie. I used my trusty electric kitchen knife to cut the foam. That's what the instructions said to use, and when the lady at JoAnn's used an electric knife to cut the length I needed, I figured it was the way to go.
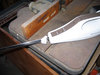
Nora thought the knife was almost as fun as the saw.

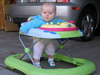
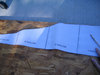
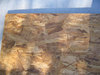
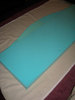
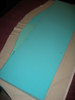
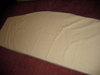
After I brought Nora inside and got her set up with some toys, I laid out my fabric, right side down, and lugged the wood and foam inside and centered the foam on the fabric. I trimmed the extra fabric a bit.
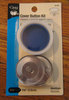
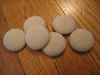
I got some big covered button kits (the only kind sold at JoAnn's) and made some buttons with the scraps I had trimmed off. I pinned the fabric loosely to the back of the foam, flipped it over, and figured out where I wanted to place the buttons. Then I sewed the buttons through the fabric and foam, and through another button on the back side to keep the thread from pulling through the foam. Here's the thing. In my experience, tufting with buttons is harder than you think it should be. For one thing, if you're using a covered button, the loop that your thread has to go through is on the back of the button. If your button is pulled into the foam really deeply, how do you get your needle back through that loop for another pass? It doesn't seem like one thickness of thread would be strong enough to keep the button tight against all that foam, either. And the first time you're pushing the needle through, it's tricky (and hurts your fingers) to push the needle in as far as you can while simultaneously compressing the foam to get the needle to poke through the other side far enough so that you can grab the tip and pull it out. I am convinced that the pros have a different set of tools to use when they're doing deep tufting--possibly including a very large needle, very strong thread, and some kind of button system with an open-faced (?) button on each side of the foam, which is easy to pull tight and allows for a decorative covered button to be snapped on afterward. Anyway, my buttons aren't as deep as I'd like, but they look OK.
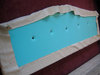
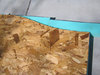
Once I had the buttons sewn in, I unpinned the fabric from the back of the foam, laid the chipboard down on top of the foam, and stretched the fabric as tightly as I could around the back of the board, stapling as I went. In a few places I had to pull the staples out, smooth things out a bit, and staple again, but it worked pretty well. I'm really glad I believed the part of the instructions that says to glue the board to the foam ONE INCH BELOW the top of the foam, even though they are cut to the same size. This allows the top of the foam to curve back around the board, making a nice round edge at the top of the headboard, instead of a slope ending with the hard edge of the board. With the headboard being so big and heavy, it was hard to get the fabric pulled tightly enough while keeping things smooth. Maybe enlist a strong person to help.
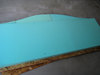
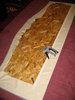
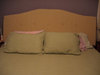
Speaking of strong people, I got Blake to help me prop up the headboard above our bed so that I could take this extremely anticlimactic picture of the final product. I don't know what's going on with the focus and the lighting and the colors here, but I'll post some prettier pictures when the whole revamping is done.
foam: $40
fabric: $18
button kits: $10
chipboard: $8
Everything else I already had or made Sarah dig out of her storage unit.
Total: $86
If I were going to do this over again, I'd use a lighter but still rigid material (MDF?) instead of the chipboard and a slightly thinner foam covered with a thin layer of quilt batting to soften the edges of the foam. I think I'd also cut the foam a bit larger than the backing, so that it would wrap around the edges more. I'd definitely try to figure out some way to get the buttons sewn in more deeply. All in all, though, I'm happy with it--and it was certainly cheaper than buying one readymade.
Posted by lisa at May 05, 2008 04:17 PMHow did you attach the headboard to wall???
Posted by: Janet on May 5, 2008 11:02 PMYea! I think I get take a turn and kill some wonder! They actually use curved needles to attach those buttons on projects like that. That way you're not trying to get the right angle, because the needle just does it for you and you can sew tightly. Alas. Next time.
And we have the same bed spread -- except mine is red.
Also? Super cute headboard.
Posted by: e on May 6, 2008 08:28 AMNice headboard, great instructions! Thanks for the link!
Posted by: Rob Cockerham on May 6, 2008 10:09 AMHAHA!! I love the look on Nora's face. It's a "WHY YOU....." look. It's great!
Posted by: Jeremy on May 9, 2008 12:26 PMWhat a good little munchkin!
And I really like your new headboard.