
May 12, 2008
Lisa: herb garden
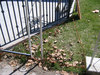
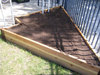
It took us at least three Saturdays, but Blake and I finally finished the herb garden we started a month ago (and have been planning since January). It turned into a much bigger project than we anticipated, but I'm really happy with how it turned out. The idea was that the garden would fill the triangular space created by the edge of our patio meeting the angle of the driveway. It's an awkward space to mow, and I thought a raised garden bed would solve that problem AND look nice there.
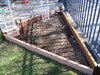
First, I mapped the whole thing out on paper and took all the measurements. Then I marked off where the garden would go, using a makeshift system of skewers and the ugliest yarn I own, Mr. Brown. We were out of string. You can see in these pictures that there are a few weird features in this corner of the yard, including two different types of wrought iron (the fence and the posts holding up the awning over the patio), two different types of cement bases for the posts, and some little braces connecting the fence to one of the posts--I assume to give stability to the fence. I was hoping the garden would sort of camouflage some of these idiosyncracies.
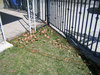
Blake cut the sod out of my marked area...
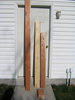
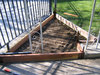
...and we picked up some redwood decking at Home Depot for the sides of the raised bed. The guys at the Depot cut it to the lengths I had measured and everything. Blake had to do a little extra cutting to make a hole for one of the wrought iron braces to go through, but that's it.
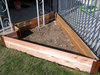
The corner brackets are made by a company called Frame It All, and I found them at a garden store in Bountiful called J&L Garden Center. The brackets are great, because they allowed us to build something that was much more complex and nice-looking than our carpentry skills would have allowed otherwise. You can use them with any 2x6 wood, too, not just the plastic stuff sold by Frame It All. A few caveats, though:
1) The included instructions only work if you're putting your garden (or sandbox, or whatever) out in the middle of an open lawn. Otherwise, you'll need to figure out the installation on your own.
2) There are two types of brackets--Anchor Joints and Stacking Joints. I think you'd only need the Anchor Joints if you have really loose, sandy soil. If you have rocky clay, like we do, give yourself a break and use the Stacking Joints for both levels. Trust me, that six-inch stake will be stable enough.
3) The copy on the box says that the joints adjust to any angle. This is not exactly true. There is a minimum angle, which is why they recommend using at least a four-foot timber between each joint. Our first layout had a very narrow angle at the top of the triangle, which was too small for the Frame It All brackets. We changed the layout a bit, picked up a few more brackets to accomodate the jog around the post anchor (and a few more boards), and ended up with a shape that I think I like better anyway.
After we cut out another strip of sod, we laid out the boards and anchors where they would ultimately go, to make sure everything would work. Luckily, I had measured things right!
Blake and Sarah helped dig the holes for the stakes, and we got the boards and joints all in place and screwed together.
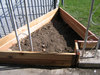
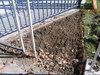
We took three trips to the garden store for bags of dirt, because we completely underestimated the amount of dirt it would take to fill up the garden. I think it was ten bags of compost and potting soil all together.
After the fresh, smooth dirt was in, it was quick work to plant the herbs and things we had bought. There's parsley, two kinds of sage, rosemary, thyme, two types of oregano, comfrey, two different mints, and I think a few others, plus several sweet williams (a Mother's Day gift from my mom) and a couple of the strawberry plants we got from the Turnbulls.
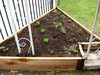
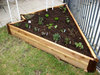
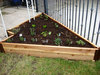
We left a little space to plant something that will climb up the post that is inside the bed. Now, if we can just manage to keep everything alive and looking nice! One of the lawn sprinklers is inside the new bed (Blake added some pipe to make it taller), so at least our efforts shouldn't be foiled by a lack of watering.
Posted by lisa at May 12, 2008 11:58 AMthe finished product looks great!
Posted by: sarah on May 13, 2008 08:05 AM